Tools For Keeping Your Hair In Control When You Aren’t

Coming to both understand and know how to properly work with one’s own hair is a lifelong journey.  We pour through blogs (no irony there), scour through magazines, ask all our friends, experiment with myriads of product, and stare into the mirror for probably what amounts to weeks of time on Earth just trying to get a grip on what it takes to make our hair look consistently great.  There are the rare awesome hair days that we manage to pull off without help of a stylist, but for the most part, our hair is just kind of … there.

Maybe you’re one of those folks that insists on every day being a great hair day, and so you wake up earlier, or go to bed later, bust out the heat tools on a daily basis, take time to actually blow out your hair once it’s washed … but that’s not everyone.  If the aforementioned describes you, I sincerely admire you.  I mean it.  Not in that fake, condescending Well I just don’t have the time for that way (because I probably do have the time, if we’re honest)… I genuinely admire you.  And my side-eye is probably just me being jealous of you.

But for those of us whose biceps start whining at the very thought of blowing out our hair, for those of us who wake up and feel like your hair needs a complete do-over if you’re going to actually style it with intention, for those of us that lack the daily discipline, for those of us who can’t wait for the curling iron to heat up- I give you my list of the most helpful hair tools for when laziness strikes.  And all are meant for unwashed hair.

FullSizeRender

A boar bristle brush

When my hair has become greasy and I have to go out before I get the chance to wash, I find it helpful to embrace the oils and brush my hair thoroughly with this sturdy brush.  It distributes the oils evenly through my hair and smooths things out.  This usually works best when my hair has gone flat at the roots and lost any wave or curl.  It also adds fluff to the body of my hair so that I can pull it back in a full ponytail or a voluminous bun.  You don’t want to brush with something wimpy on second or third-day hair; a plastic bristled brush or something less dense won’t control the oil as well.

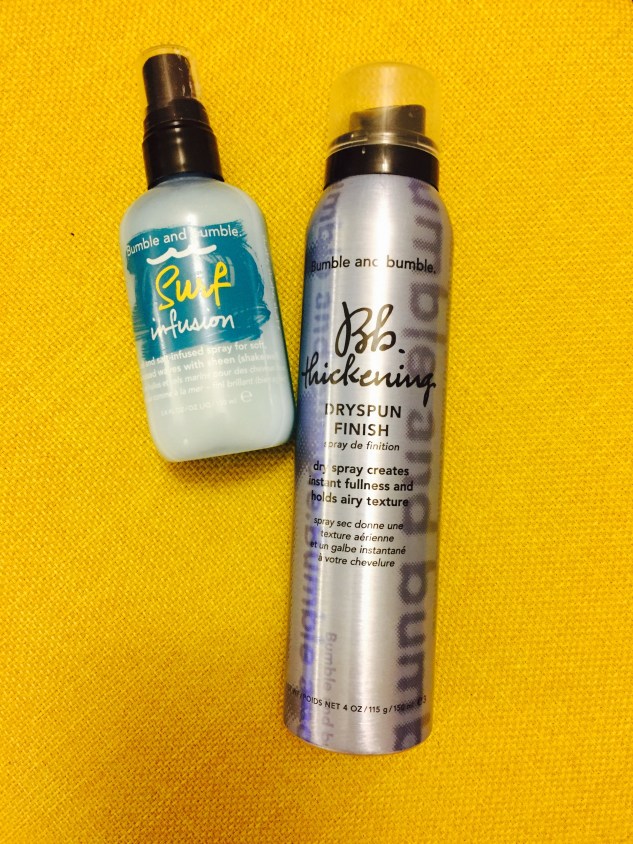
A combo of sea salt spray and dry shampoo

In my case, I prefer Bumble and Bumble’s Surf Infusion spray that contains hydrating oils in it along with the salt mixture, because salt sprays can really dry out my hair.  The Surf Infusion brings texture, volume, and some curl or wave back into the lengths of my hair without making it feel like a sticky pile of hay with tacky glue all over it (as is the case with some texture products).  If I add a little Living Proof Perfect Hair Day Dry Shampoo to my crown along with that, I’m usually in fighting shape for another day.

A black elastic headband and some bobby pins

These usually end up being the tools for my hair during the final day before a wash.  I also default to this style when I just want my bangs out of my face.  I pull my hair up in a high bun, try to “neaten” it by pinning down the pieces poking out with bobby pins, and pin any bits falling out as well as my bangs.  Adding the black headband can give it a sporty vibe or something a little more ballerina inspired if the band is maybe a satin ribbon, and if the bun is elegant enough.  Be sure to push the band forward enough and see that it’s not too thing; otherwise, you end up looking more like a high school soccer player.  I’ve been trying to see what I can add to make this look more intentional rather than haphazard; its very easy for a quick bun to look haphazard in my case.  If my bangs are in good shape, they can really take a bun to the next level, as bangs can give a bun that extra “fashion blogger” feel.

On some days, if the lengths of my hair are doing okay, I’ll just pin back my bangs with two bobby pins in an “X”.  A little dry shampoo in the roots and that pretty much settles things.

A shot of cold air with a blowdryer or a spritz of water

Sometimes, the best answers are the simple ones.  Running over your hair with a blowdryer can do different things on different days.  For me, sometimes it volumizes it, brings back texture, adds shine, etc.  Other days, it doesn’t really do anything.  I’m not one for claiming my advice is foolproof; things just don’t always work on everyone’s hair, everyday.  The same goes for water.  On occasion, just spraying my lengths with water has done amazing things.  It’s brought back wave or tamed frizz in certain areas when it’s dry out; other days, my hair dries and looks just as it did before.  My point is, sometimes you just give different solutions a shot and see what happens before resorting to pinning it up.

Any other ideas you have to offer?  I always hear about the braiding solution, but as I’ve mentioned before, that’s something I can rarely do without needing a third or fourth arm.  Anyhow, I’m an open book, so give me your tips!  xo, MR

How To: Seriously Beachin’ Waves

Loose, shine-free, textured waves are my favorite kind of hairstyle.  It’s fairly easy to replicate the look on myself because my hair has some natural wave to it, so the bias is obvious.  However, I do love the different which-ways you can make waves go, and I like their easy, laid-back feel.  My friends will tell you that one of the ways I express friendship is by “waving” your hair- I’m not kidding.  It’s the most relaxing process for me.  And just the word “wave” evokes peaceful memories of the ocean, and being a California girl, that’s never a bad thing.  Although, authentic “beach waves” with a bit too much salt going on can get a little crusty if we’re honest.  There’s a difference between looking like you spent a weekend at Laguna Beach or a year on an island with Tom Hanks in a loincloth.

When I create my own waves, I go by a couple tried-and-true tips so they don’t look too neat, but I do want to make sure they have plenty of body.  If you have curly hair, the general method is to blow your hair out straight first and then create the waves, but that’s a lot of heat and effort so I understand if you bypass this how-to with an annoyed eyeroll.  I’d encourage you to still give it a shot though, when you’ve got extra time just for fun!  If you have stick-straight hair, this may still work but you will probably want to crank the heat on your curling rod and a good dose of hairspray won’t hurt, either.  Regardless, see if this works for you too.  I love straightening my hair when I have time, though it’s a different kind of vibe with bangs.  Making my hair extra curly is the hardest for me, but it’s been really fun the few times I’ve executed it well.  Waves are just the easiest for my hair type, and here’s what I do to get them.

IMG_1755

Step 1:  Freshly washed hair works best, because you can rough dry it and give it serious volume.  I’ll wash and condition my hair, comb it through with a wide-tooth comb and a few sprays of Unite’s 7-Second Conditioner, and give it some time to air dry.  This allows at least a little natural texture to come through, which is good.  If I’m doing my makeup, I try to take this time to apply moisturizer and get my face makeup on while my bangs are still pulled back.  Once my bangs are dry and styled, it’s hard to do my makeup without messing up my bangs.

Step 2:  After my hair has had a little time to dry (think like, 60% dry), I’ll use a blowdryer to rough dry it the rest of the way.  No brush required (except for the bangs, just a little bit)!  I’ll flip my head upside down and all that, and just kind of go at it until it’s dry.  You don’t want to lay a heat tool to it while it’s still damp at all, or you’ll basically boil your hair.  After it’s dry, I spray some more heat protectant on it and let that settle for a minute.

Step 3:  I wave my hair in three sections- bottom, middle, and top.  I’ll use a clip to keep the upper sections of my hair out of the way as I go.  Using the Hot Tools 1.25′ curling iron, I’ll take small chunks of hair (probably 1-inch sections) and wrap them around the iron.  The key is to not use the clamp; just wrap the hair around the iron and hold it there for a couple seconds.  When you wrap the hair, don’t wind it tightly around the iron; think more of a languid, ribbon-around-the-Maypole kind of wrap as opposed to tightly winding thread around a little spool.  You want these waves to be loose and lazy.  Also, I try to not wrap hair in the same direction every time.  I try alternate between wrapping forwards and backwards, although if you wrap in all one direction I actually don’t think it turns out that bad.  Another thing- I leave the ends out!  That’s a big part of the beachy feel; don’t wrap about the last inch of hair around the iron.

Now, I suppose you could just use a curling rod for this whole process, but the results with a rod are almost a bit too precious from my experience.  The best rod I know of is the Sarah Potempa BeachWaver, but Hot Tools costs a fraction of the price and they yield the same results in my opinion.

Step 4:  Time to apply texture product!  As you curl each section from bottom to top (and by curl, I really mean wave), liberally mist a dry texture spray all over the waves you’ve created.  I like Bumble and Bumble’s Thickening Dryspun Finish and Oribe’s Dry Texturizing Spray.  Spray it into the roots and, as you go through each section, flip your head upside down and shake out your waves with your hands.  Additionally, take another texturizing product that isn’t dry, like Living Proof’s Instant Texture Mist, and apply it to the ends.  I spray some of this into my hands (because it can be sticky) and scrunch it into the midlengths and ends.  I love the effect of this particular product; it gives a piecey-ness to the look.  You can also try a wet sea spray like Bumble and Bumble’s Surf Infusion like I did this time; it has moisturizing oils in it so it not only gives that beach effect to my ends but it also moisturizes them, which is nice after all the heat styling.  And it has just enough sea salt in it to not be too drying.

FullSizeRender

A lot of people also like to add a mousse or some other volumizing product before they begin rough drying, but my personal experience has been that applying stylers after drying my hair is the most effective.  I get plenty of volume with a dry texture spray, but if you have success with a product applied to wet hair, by all means go for it.

The nice thing about this style is that it tends to hold up pretty well the next day.  You can always go back over sections with the curling iron again, too.  And dry texture spray also functions as a dry shampoo; that stuff is seriously the gift that keeps on giving and is by far my favorite hair innovation of the past five years.

Let me know if you try this or these products, and tag me in your pictures if you do!  xo, MR

The Realist’s Guide To Hair Growth

It seems that every time I go on Pinterest these days, I run into a new pin that has however many tips for growing out your hair.  Lauren Conrad’s blog has ’em, BeautyBets has them, I’m pretty sure Maskcara has hers, and seemingly hundreds of other bloggers have their own ideas about supplements, treatments, and products that will magically cause your hair to grown by a foot within less than a year.  So why not unnecessarily add to the pile?!  Well, here’s a difference for you- Consider this the realist’s guide to growing out your hair, because over the years I’ve found that there really isn’t that much truly aides in hair growth other than a whole … lot … of patience.

2654151_f260

Because this is what you had in mind, right?

1.  You need to consider your decision to commit.  Now, this may sound like a no-brainer, but it’s a biggie.  Let me tell you from experience that it’s very, very easy to decide that you are going to grow out your hair and then quickly recant that decision after observing a few broken ends one afternoon or a picture of Taylor Swift’s latest chop.  How many times have you decided that you’re going to grow out your hair, only to become frustrated by a lack of results or made anxious by split ends, only to find yourself having a couple inches cut?  Or you cave and go for the trendy, shorter cut in a moment of whimsical impulse?  If you’re like me and your hair does not grow back quickly, you need to commit to growing out you hair and you must refuse to compromise that decision.  Don’t worry about the cut of the moment on Instagram.  Ignore the comments from those who make you feel ‘boring’.  Insist on only the slightest of trims, and have a stylist by your side that will help you stick to your goal.  Keep pictures of inspiration on a bulletin or Pinterest board to keep you motivated.  Katie Holmes’ hair growth journey has probably been my most inspiring personally, as she’s gone all the way from near-pixie to princess length.  Deciding that you’re actually going to do it will help boost your confidence that you’ll eventually get there.

2hbz-Katie-Holmes-Shine-012412-de

My mane inspo.

On another note, give yourself an “enjoy by …” timeline.  Once you’ve grown out your hair to your desired length (and be clear to yourself about what this length is, whether down to your collarbone, breasts, mid-back etc), set a specific amount of time aside to just enjoy it so you can really feel and know that you’ve done what you set out to accomplish.  Lately I’ve gotten so caught up in the growing process that I haven’t taken time to acknowledge that my hair is finally, actually where I’ve wanted it to be for the past year or so!  I’m now allowing myself four-to-six months to just keep the length as it is and enjoy it.  After that, I’ll decide if I want to go for something else.

2.  You need to consider your genetics.  Be realistic about how long it has taken you to grow out a cut in the past.  Your hair just may not grow very quickly, and accepting that fact will help you to not be so discouraged.  Allow yourself plenty of time to let your hair do its thing, and if you see your friends’ hair growing faster than your own, stop comparing and don’t worry.  We all come with a different set of genetics, and it isn’t fair to assume that your hair will grow at the same rapid pace as your friends’ (unless, of course, you’re burning yours every day with a flat iron and she isn’t, which we’ll get to next).  I’ve had to come to terms with the fact that my hair does not grow like a weed (or rather, it splits more quickly than it grows), but I have to keep on keeping on.  If you’re just past the collarbone and the splits have you feeling discouraged, have a half-inch trimmed off and then keep going.  So, while you must consider your genetics in order to give yourself a reasonable amount of time for hair growth, persistence is still key.

3.  You need to consider what you do on a daily basis.  Hair growth, as you know, takes place at the scalp.  Hair, skin and nails all benefit in many ways from a nutritious diet that’s full of omega-3s, vitamin C, iron, folic acid, biotin, and protein (oh and WATER).  If you’re sticking to a diet of mostly sugars, fats, and empty carbs, chances are you’re not going to yield the lustrous locks of your dreams, even with all the fancy Kerastase treatments in the world.  Smoking also introduces a plethora of problems to hair growth (for starters), and steaming hot showers sap moisture from your hair and scalp too.  However, don’t expect a few servings of salmon to suddenly turn your mane into that of a Victoria’s Secret model.  Keeping a consistently healthy diet will mean healthier hair, but keep in mind that “healthier” doesn’t necessarily mean faster growth or increased thickness.  What it will probably mean is that what you already have growing out of your head will be in its very best shape with each strand growing strong and shiney, allowing your hair to grow with less breakage.

Now, as true as it is that your hair comes from your scalp, what you’re doing to the ends of your hair on a daily basis will also have a major impact on length maintenance (not to mention the dreaded extensions or frequent dye jobs [and the platinum trend is doing nothing for anyone in this category]).  If you’re eating right but you’re curling, blow-drying, or straightening your hair multiple times a week, your ends are going to break, and that breakage will travel up the hair shaft causing what will seem like entire strands to snap off, making all that good scalp growth useless.  Rough hair brushing, tight elastics for buns and ponytails, and coarse cotton pillowcases will also work against length maintenance.

SNN0415BRIT---_1448243a

Pretty sure no one did the butter yellow, white girl weave like Britbrit.

So my advice?  Well, it’s nothing you haven’t heard before.  Lay off the heat.  Try air-drying, and don’t wash or style your hair so often.  Be intentional about what you consume.  Try using fabric scrunchies and a satin pillowcase.  Changing your daily habits could yield some surprising results when it comes to general hair health.  It’s our every day habits that have nothing to do directly with hair that tend to go most overlooked when it comes to growth.

4.  Having considered the aforementioned, you may also need to consider that that bottle of Moroccanoil may not be helping in the way you think it should be.  I am somewhat convinced by this point that there is no true “miracle product” when it comes to hair growth.  There are products that smooth better than others, give volume better than others, or perhaps protect against heat better than others, but I really don’t believe anymore that there are products that jump-start your scalp and cause your hair to grow at light speed.  No, I don’t even believe that consistent use of Viviscal will do more than keep your hair in the shape that it’s already in.  I feel that the most you can look for in products in terms of helping hair growth is heat protection and split-end prevention (and maybe temporary repair, or the look of repair).  I deep condition to protect and bring extra moisture, and I use treatment products for the same reasons. I think I’ve finally been able to admit over the past year that no protein-rich conditioner will be able to undo what my curling iron has already done, that a trim is sometimes the only answer, and that the word “repair” is to be taken with a grain of salt when seen on product packaging.

5.  You need to consider enjoying what you have.  Growing out your hair can be incredibly trying because it tends to involve constant comparison and thoughts about what you wish you had, rather than what you do have.  I haven’t met hardly anyone who was openly satisfied with his or her hair.  We (and I’m included in this) have a tendency to always see a whole lot of “yuck” in the mirror when we look at ourselves, and it has deeper implications than we may realize.  Refusing to take joy in the hair (or face, or body, etc.) we have prohibits us from ever being content, and it brought me personally to the point where I couldn’t even see how long it had grown or how pretty it actually could be.  We often think “If only it looked like this; then I would be happy with it”, but we know this is never truly the case.  We kind of have to go all the way back to the fact that it’s just hair, and practicing the virtue of gratefulness will help us love what we have and see it for what it is- a gift!

Let me know what has or hasn’t helped you in your hair growth journey, and if I’m a complete lunatic when it comes to superfoods or helpful hair growth products.  Call me crazy, but there are few things I enjoy talking about more than hair health so bring me all the questions and bring me ALL the answers!  xo, MR

It … could … work!

So, you know how sometimes you’ll be looking at some ‘How To’ tutorial article in a magazine that shows you (in three easy steps!!) how to blow out your own hair into goddess locks? Seriously, it’s so easy, right? And then they’ll recommend, like, one miracle product that will do just the trick to get you from Point A to Point Z. Seriously, just a little dab of Moco de Gorila and BAM- your hair be lookin’ like this.

I think we’ve all felt a little mislead at some point by tutorial articles. The work it truly takes to achieve that kind of red carpet hair can have a team of stylists clocking in literal hours on one head of hair. However, every once in a while one little feature is found to be so helpful and accurate, like a precious golden nugget.

Enter this ever-so-tiny feature in the July 2012 issue of People StyleWatch. My recent haircut had rendered me somewhat anxious as to how to style it in it’s more natural state (read: wavy/curly). This little gem recommended just a couple cheaply-priced products and the fabulous, super-convenient suggestion of air-drying your hair overnight! I chose to purchase the Herbal Essences Tousle Me Softly spray gel because I’d never tried a spray-gel before, and the novelty only cost me five bucks. I followed Strahan’s instructions, covered my hair in heat-protectant spray the next day, misted with the spray gel, and then used my 1-inch iron to create waves in different directions. I had good feelings about this one. It could work!!

Voila! I’d say it was a success! You’ve gotta love successful little tips in a world full of useless beauty information. The spray gel has a nice scent, but for how much I touch my hair I find that I have to use quite a bit for the waves to really hold strong. No harm in that, though. Cheers! xo, MR

Hair today ……..

This is me, waving a fond farewell to my long locks (the longest they’ve been, I believe, since high school). They’ve made for some of the greatest summer hair I’ve ever had, complete with ombre’ color, and they’ve not been cut since … February? Yup, February. They’ve maintained their health thanks to my regular routine consisting of washing just twice a week, cold rinses, deep conditioning with every third wash, air-drying almost 100% of the time, and a little miracle product from Kerastase called Fibre Architecte, which probably extended the life of my ends by at least two months.

However, it is now late August, and the children shall be returning to school which means that I’ll be returning with them. I’ve also begun my usual routine of incessantly picking at my split ends that probably weren’t as bad to begin with until I got my paranoid hands on them. And then there’s also the fact that I just love a good cut to transition into a new season (even though it’ll continue to seem like summer out here for at least two more months, probably).

And so, I bring you the long bob as styled by the great Justin Kamm over at Salon 9 in Orange:

Inspired by one of Anne Hathaway’s cuts from the not-quite-so-recent years, I decided to steer away from layers and go for a more blunt look. I love it unquestionably, but I also love how my hair was less than five hours ago. That’s a good thing though, right? I like it most any way these days, and that should be enough to shut me up and keep me pretty satisfied. Thanks Justin! xo, MR

Concerning my hair, and how much I used to hate it but now do not.

It’s true. I really, really hated my hair up until perhaps two years ago.

During high school, I wanted long, straight hair. Well, perhaps with a little wave, but I thought the most beautiful hair was blown-out, flat-ironed hair. I remember finally getting a flat-iron for Christmas that had legitimate power (as in, you could fry a piece of bacon with it by just passing it through the plates once) and I was so excited. Finally- no more weird kinks, no more untamed baby hairs at the front of my face, no more frizz.

And so that’s how it was for me for like, six years. When I had the time, I’d blow out and flat-iron my hair until I was satisfied with it’s texture. And because I barely knew how to properly proceed with such a task, it would take me forever. The real problem, however, was the fact that my hair is nowhere near naturally straight. It’s wavy, verging on curly. Add to this the fact that it’s not terribly thick, and you’ve got dry, somewhat delicate hair … not ideal for frequent frying (say that five times fast). On top of that, I’d spend all this time trying to control my hair into what I thought it should be only to have it zap back into its natural state once any ounce of humidity hit. It was a grueling era of fighting against my genetics.

And then in mid-to-late college, I discovered the curling rod. Oh, the curling rod. At that point I’d gone from desiring pin-straight locks to wanting Kim Kardashian’s Disney princess length and perfect waves. I’d even given thought to getting extensions (a thought that doesn’t pass through my mind anymore … perhaps more on that later). And so, again as a result of not knowing what I was doing, I’d wind each section of hair around and around that rod, until my head was covered in brown spring-coils (and it didn’t even look like Kim Kardashian). I thought it looked good, my friends may have thought it looked good … but looking back, it didn’t look that good.

But something happened between that point and now. I began to lose the luxury of a little something called time. I was working at a coffee shop (and do I still work there? I’ll never tell …) and teaching high school social science all within the same days, and there were just too many days where I had to just get up and go. Toss my hair up in one of my beloved topknots or just leave it the way it was. I’m not a good waker-upper, and so whatever my hair looked like when I got out of bed … was pretty much how it was going to stay all day. But as I would peruse through one of my fashion publications, I’d be surprised to see how much messy hair was being sent down the runways. Or how much easy hair, I could say. And then, on the beauty blogs I’d read, I’d always see these beautiful French women with clear, luminous skin without makeup, but paired with undone hair. It would look so, “I don’t give a damn but I know I still look fine”. And that’s when my idea of beautiful hair changed.

Beautiful hair has texture, versatility, and health. Beautiful hair is like an art media that can be molded into what you want. You can curl it, straighten it, color it, style it sleek, style it rumpled and messy, or just do nothing with it. You can just leave it be when you want, because beautiful hair doesn’t need to be controlled. It is well taken care of, and left alone when it needs its alone time. Beautiful hair is loved in its natural state.

Sometimes I make some waves in it, but most of the time I let it air-dry. I’ll blow it out every once in a long while, but most of the time I just let it be. I am a deep-conditioner addict (as in I leave it on for twenty minutes or so and I do it every third wash), and I only wash it twice a week. I’d perhaps like there to be a little more of it and maybe a little thicker, but I find myself satisfied with the fact that when a hairstylist gets hold of it, I frequently get compliments on how easy it is to work with. If a stylist is giving me the thumbs-up, that’s all I need. Here, a look at the products that keep my hair at its best-

I’ll give a breakdown on why some of these are my favorites later, but you can probably at least tell that I like to take the more natural route when it comes to my hair. And I prefer the natural look, as well. I’m not looking for overdone, I’m not looking to add to what’s already there, and I’m not looking for Kim- I’ve got me. That’ll do. xo, MR

The most unflattering/greatest hair-do of all time.

“I always love your little buns”.

I remember my friend Bonnie saying that to me one afternoon about my hair.  I’d done what I do so often these days: twirled it up into a little knot and wrapped an elastic around it.  I am always wearing my hair in a topknot.  And no, not a perfectly Pinterest-ed “sock bun” that looks so sixties-chic with volume and hairspray.  It’s a tiny little knot, just sitting there at the top of my head, flattering my face in no way whatsoever.  But I love it.

However, I wasn’t always comfortable giving in to this style.  In the autumn of 2010 I was extraordinarily busy with a social science teaching internship at a high school.  Prior to starting the school year I’d had visions of beautifully crafted outfits and blown-out hair every day, impressing my students with my abilities to grade their papers, develop stimulating and challenging lesson plans, and look amazing without missing a step (and how foolish I was to not foresee that you can pretty much afford to choose one of those options- the others go down the drain).

By November, the hair was being ignored.  But by “ignored” I mean it was being carelessly and quickly twisted up into one of these little “samurai buns”, as another friend once called it.  At first I felt ridiculous.  I mean, sometimes it was still wet and my hair was just sitting there as this pathetic little ball at the top of my head.  I even named it my ‘I-give-up bun’.  

Over time though, my feelings began to change toward my little buns.  I’d seen this picture of Jessica Hart in an issue of Harper’s Bazaar, and this model was wearing her hair just like mine!  And it didn’t look half bad.  I remember thinking, ‘If a model with a serious career like Jessica’s can wear her hair like this and just not care how people feel about it (even though it looked great regardless), then so can I.’  

I instantly felt at peace with my little buns, or after learning their proper name, my topknots.

I’m a top-knotter for life, now.  There’s something so French about just tossing up your hair like that, because you don’t really care about how it turns out and yet just that mentality manages to add this sense of chic to it that’s so hard to articulate.  I guess that’s what they mean when they refer to je ne sais quois.