Makeup For A Night Out- My Friend Meg

It’s been way too long since I’ve done someone’s makeup for a special occasion; my last real client was before our move out here!  The only thing that’s come close is when I had the pleasure of doing a trial run for a beautiful girl attending her senior prom here in Illinois, but her plans fell through at the last minute.  So, since July of last year, it’s really just been me tending to my own face (which begets way too many selfies, let me tell ya).

So you can imagine my excitement when my friend Meg, whom I’d gotten to know through church, asked me to help her with both makeup and hair!  I admit I was a little nervous because it had been so long, but I was too excited to work with someone again to let the nerves bother me.  Meg was attending a benefit event for the Rehabilitation Institute of Chicago, and the cocktail attire dress code provided the perfect excuse to play around.

fullsizerender-2

I prepped Meg’s skin with Glossier’s Super Bounce serum, which perhaps turned out to be her favorite product we used that day.  Luckily, even though I’d brought my own kit with me, Meg had an amazing arsenal of her own with plenty of great stuff to choose from.  We primed her skin with Laura Mercier Radiance Foundation Primer, and then I used a Beauty Blender to evenly apply Bobbi Brown’s Skin Foundation Stick in Beige all over.  After a dusting of BareMineral Original Foundation in Light to set it, I used Meg’s two Cle de Peau concealers to the undereye area as well as around the nose and lips.  If I can name one area on the face that always gets overlooked when it comes to concealer, it’s the nose area.  The skin around your nostrils and at the bottom of your nose almost always suffers from discoloration; a good concealer on these spots has a real lifting and brightening effect.  To set the undereye concealer, I used Laura Mercier’s Secret Brightening Powder.

For Meg’s eyes, I stuck with some of my most trusted friends- MAC eyeshadows in Shroom and Cork, and my Dior 5-Couleurs Eyeshadow palette in Earth Reflection.  I used the two brown shades in the Dior palette, along with the pearly-white one for the brow bone and inner corners of the eyes.  The hardest part of makeup for me, to this very day, is properly blending multiple eyeshadows.  I really try to get a look at the eyes from all angles and in both natural and artificial light; I tried to take my time getting this just right because unblended eyeshadow is truly painful to behold (and here’s a tip- shimmery shadows are much more forgiving than matte ones when it comes to blending).  I lined Meg’s eyes with my BFF- Christian Siriano for Victoria’s Secret eyeshadow in Royal- and I don’t know what I’ll do when it finally runs out because I’ve yet to find anything quite like it.  For lashes, we used multiple layers of Meg’s Bobbi Brown Eye Opening Mascara.

img_3019

I did a bit of contouring with Kat Von D’s Shade and Light Palette, and used Chanel’s blush in In Love for cheeks.  I added a bit of highlighting using MAC’s Mineralize SkinFinish on the top of the cheekbones, and a touch of a pearly NARS cream shadow to the cupid’s bow.

Finally, for lips, Meg prepped them with MAC’s Prep + Prime.  We then used Laura Mercier’s lipliner in Natural Lips topped with NARS Velvet Satin Lip Pencil in Bahama- this is the perfect dusty brick-rose with just enough color to be a “statement lip” without needing to be fire-engine red or something.  We had her pack a clear gloss with her along with the pencils, just for extra moisture.  To set everything and give the whole look a diffused effect, I dusted Meg’s face all over with Hourglass Ambient Lighting Powder in Mood Light.

fullsizerender

As for hair, I’d known for a while that I basically wanted to take inspiration from Ahn Co Tran and go for waves with lived-in texture.  This is my favorite look, and frankly, it’s one that I know I can replicate fairly well on others.  Meg has a midlength bob so I knew this texture would be perfect for her cut.

I used my tried-and-true technique of wrapping one-inch sections of hair around a 1.25-inch curling iron, without using the clamp and always leaving the ends out.  If you try this, try to wrap sections loosely so you don’t get a wave or curl that is too tight.  As I progressed through her hair (and I did it in three layers, working from the bottom up), I’d separate any waves that were too big or tight and finish with a generous mist of Bumble and Bumble’s Dryspun Texture Finish- better than Oribe!  I also sprayed Living Proof’s Instant Texture Mist into my hands and worked it into Meg’s hair, too; the Texture Mist provides bouncy hold and sort of acts like a spray-gel, but better.

fullsizerender-3

I kept laughing because Meg kept saying how I understand “the bend”- no one wants their hair truly curled these days, we all just want it to have that awesome “bend” that looks chic and lived in!  It’s the best!

One adorable Majè jumpsuit later and Meg was ready!

fullsizerender-4

I had such an awesome time playing around with this sweet mama- she looked amazing and I was so happy with how much she enjoyed the whole process!  I can tell you that it’s so much more fun with the client is interested and curious about what you’re doing, from the skin prep to the final touches.  And I was truly happy to finally lend someone a beautifying hand on the North Shore- it’s about time!  xo, MR

How To: Seriously Beachin’ Waves

Loose, shine-free, textured waves are my favorite kind of hairstyle.  It’s fairly easy to replicate the look on myself because my hair has some natural wave to it, so the bias is obvious.  However, I do love the different which-ways you can make waves go, and I like their easy, laid-back feel.  My friends will tell you that one of the ways I express friendship is by “waving” your hair- I’m not kidding.  It’s the most relaxing process for me.  And just the word “wave” evokes peaceful memories of the ocean, and being a California girl, that’s never a bad thing.  Although, authentic “beach waves” with a bit too much salt going on can get a little crusty if we’re honest.  There’s a difference between looking like you spent a weekend at Laguna Beach or a year on an island with Tom Hanks in a loincloth.

When I create my own waves, I go by a couple tried-and-true tips so they don’t look too neat, but I do want to make sure they have plenty of body.  If you have curly hair, the general method is to blow your hair out straight first and then create the waves, but that’s a lot of heat and effort so I understand if you bypass this how-to with an annoyed eyeroll.  I’d encourage you to still give it a shot though, when you’ve got extra time just for fun!  If you have stick-straight hair, this may still work but you will probably want to crank the heat on your curling rod and a good dose of hairspray won’t hurt, either.  Regardless, see if this works for you too.  I love straightening my hair when I have time, though it’s a different kind of vibe with bangs.  Making my hair extra curly is the hardest for me, but it’s been really fun the few times I’ve executed it well.  Waves are just the easiest for my hair type, and here’s what I do to get them.

IMG_1755

Step 1:  Freshly washed hair works best, because you can rough dry it and give it serious volume.  I’ll wash and condition my hair, comb it through with a wide-tooth comb and a few sprays of Unite’s 7-Second Conditioner, and give it some time to air dry.  This allows at least a little natural texture to come through, which is good.  If I’m doing my makeup, I try to take this time to apply moisturizer and get my face makeup on while my bangs are still pulled back.  Once my bangs are dry and styled, it’s hard to do my makeup without messing up my bangs.

Step 2:  After my hair has had a little time to dry (think like, 60% dry), I’ll use a blowdryer to rough dry it the rest of the way.  No brush required (except for the bangs, just a little bit)!  I’ll flip my head upside down and all that, and just kind of go at it until it’s dry.  You don’t want to lay a heat tool to it while it’s still damp at all, or you’ll basically boil your hair.  After it’s dry, I spray some more heat protectant on it and let that settle for a minute.

Step 3:  I wave my hair in three sections- bottom, middle, and top.  I’ll use a clip to keep the upper sections of my hair out of the way as I go.  Using the Hot Tools 1.25′ curling iron, I’ll take small chunks of hair (probably 1-inch sections) and wrap them around the iron.  The key is to not use the clamp; just wrap the hair around the iron and hold it there for a couple seconds.  When you wrap the hair, don’t wind it tightly around the iron; think more of a languid, ribbon-around-the-Maypole kind of wrap as opposed to tightly winding thread around a little spool.  You want these waves to be loose and lazy.  Also, I try to not wrap hair in the same direction every time.  I try alternate between wrapping forwards and backwards, although if you wrap in all one direction I actually don’t think it turns out that bad.  Another thing- I leave the ends out!  That’s a big part of the beachy feel; don’t wrap about the last inch of hair around the iron.

Now, I suppose you could just use a curling rod for this whole process, but the results with a rod are almost a bit too precious from my experience.  The best rod I know of is the Sarah Potempa BeachWaver, but Hot Tools costs a fraction of the price and they yield the same results in my opinion.

Step 4:  Time to apply texture product!  As you curl each section from bottom to top (and by curl, I really mean wave), liberally mist a dry texture spray all over the waves you’ve created.  I like Bumble and Bumble’s Thickening Dryspun Finish and Oribe’s Dry Texturizing Spray.  Spray it into the roots and, as you go through each section, flip your head upside down and shake out your waves with your hands.  Additionally, take another texturizing product that isn’t dry, like Living Proof’s Instant Texture Mist, and apply it to the ends.  I spray some of this into my hands (because it can be sticky) and scrunch it into the midlengths and ends.  I love the effect of this particular product; it gives a piecey-ness to the look.  You can also try a wet sea spray like Bumble and Bumble’s Surf Infusion like I did this time; it has moisturizing oils in it so it not only gives that beach effect to my ends but it also moisturizes them, which is nice after all the heat styling.  And it has just enough sea salt in it to not be too drying.

FullSizeRender

A lot of people also like to add a mousse or some other volumizing product before they begin rough drying, but my personal experience has been that applying stylers after drying my hair is the most effective.  I get plenty of volume with a dry texture spray, but if you have success with a product applied to wet hair, by all means go for it.

The nice thing about this style is that it tends to hold up pretty well the next day.  You can always go back over sections with the curling iron again, too.  And dry texture spray also functions as a dry shampoo; that stuff is seriously the gift that keeps on giving and is by far my favorite hair innovation of the past five years.

Let me know if you try this or these products, and tag me in your pictures if you do!  xo, MR

An Autobiographical Top Shelf

This post is done in the style of Into The Gloss’s Top Shelf feature, which I’ve been obsessed with for about five years now.  So basically, I’m pretending I’m being interviewed by Emily Weiss on all the products I love, in my own home, complete with “professional” photos/selfies.  Fake it ’till you make it, right?

My routine is hard to explain briefly.  I’ll say this, though- I am not low maintenance when I don’t have to be.  There’s no shame in that.  I’m addicted to haircare, skincare, makeup, all that, but I really don’t afford myself much time to enjoy it on a daily basis.  I either want to spend an hour getting ready just the way I like, or I want to be out the door in five minutes.  All or nothing.  It’s part of how I appreciate beauty- I hate doing any of it halfheartedly.  One of my least favorite things is when I try to quickly wiggle on some mascara in the morning on the way to work and then it turns out all sloppy and incomplete by my standards.  It’s not worth it.  I’d rather bite the bullet and go bare.

SKINCARE

So, what I do depends on the day.  If I have time, I start from the bottom layer and work up, though I try to make the skincare thing happen every day.  I typically begin with a serum, and I’ve decided Caudalie’s S.O.S Thirst Quenching Serum is the best.  I tried Shiseido’s Ultimune, but I like Caudalie’s better for the money.  It feels so fresh on my skin, sometimes I forget to put on moisturizer afterwards.  It’s been hard to pin down a great moisturizer for me because I’m always looking for something natural, but effective and with SPF that doesn’t leave a weird residue.  I’ve been using Origins A Perfect World Moisturizer these past couple months.  It smells amazing and has SPF 25.  I’ve also like Desert Essence’s Daily Essential Defense Moisturizer from Sprout’s or Whole Foods, but it wouldn’t absorb well when it was hot out so I continued my hunt.  When I checked out Origins, the lady helping me gave me a quick facial and she talked me into the toner from the same line.  I haven’t used toner in forever because I feel it’s unnecessary and drying, but this stuff felt tingly and actually left my skin moisturized.  There’s a lot of white tea in it.  We’ll see if I keep it up.

Processed with VSCOcam with c1 preset

For face wash, I alternate between Origins and Desert Essence, which is entirely made of oils and some castile soap.  It sounds basic, but there’s a ton of random stuff in it like bladderwrack extract and goldenseal root extract that I hadn’t even heard of before using it.  For a night cream, I’ve been using Acure’s for a couple years and it’s really rich with lavender and chamomile.  It’s very calming.  I think they sell it at Target now, but it’s been at Whole Foods forever.  For zits, I’m pretty faithful to Mario Badescu’s Drying Lotion.  My husband loves it too.  I try to just leave zits alone for the most part these days; I find that doing anything to try and “heal” them just aggravates them or doesn’t quicken their disappearance.  Sometimes I’ll do a mask if I’m just watching Netflix late at night.  I’ll use Lancome’s Hydra Intense Masque.  It’s super cooling and smells amazing; I love putting on some I Love Lucy and having a late-night snack when I do a mask.  Best ritual ever!  I’ll also use Origins’ Clear Improvement charcoal mask for porous areas; the lady who gave me the facial at Origins gave it to me for free!  I like face wipes too, and my favorite are the Yes To Cucumbers kind.  I can’t tell you how many packs of those my mom has jammed into my Christmas stocking over the years.  I buy them in bulk at Target.

The one thing that’s still sort of a mystery to me is eye cream.  I like ones that are cooling and depuffing, and I like rollerball kinds best because they’re more sanitary than dabbing your finger into a jar of cream and then putting it on your eye.  Simple Skincare makes a good one, as does First Aid Beauty, but I don’t know.  I’m just not there yet.

HAIR

My hair stylist knows I’m a major product addict.  The funniest thing has been when I’ve asked him about products from lines that he uses before they’re even out yet or before he’s heard about them!  I read about hair stuff in magazines and then I want to go out and try it.  New hair products are what I get most excited about, so I’ve tried a lot but I can finally say I have favorites.  I wash my hair every three or four days, and I alternate between two shampoos.  I’ve been using Rahua’s shampoo for over three years now, and it’s pricey but I feel absolutely no guilt using or purchasing it because it’s so natural.  There’s really no soap in it.  It’s another product made up mostly of oils.  I’ll use another shampoo every other wash, typically an Aveda one like their Color Conserve or Dry Remedy.  I’ll try anything for conditioner.  I’ve been obsessed with conditioners since my late teens because I was always trying to find ones that would make my hair grow or repair it, but I don’t really believe conditioner does that anymore.  I’ve used one from Davines for a long time called Momo; I love it.  I’ll also ask for Kerastase samples from my friend who works at a L’Oreal salon because I can’t afford Kerastase, but their deep conditioners have the craziest reputations so I’m always desperate to try them.  I also like Alterna, mostly their treatments from their Caviar line.  They’re good for when I want to grow my hair out.  I use Unite’s 7 Seconds Leave-In Conditioner to detangle with a wide-tooth comb after I wash, but I think I like Bumble and Bumble’s Prep spray better for this.  I’ll go back to it after I run out of the Unite.  The Prep spray has hops and rosemary, the latter of which is good for lice prevention.  I work around kids, and lice is one of those things that you can’t really avoid if you’re in that environment.  It’s part of life, so you just have to do what you can.  Tea tree oil works well for this too, by the way.

Processed with VSCOcam with c1 preset

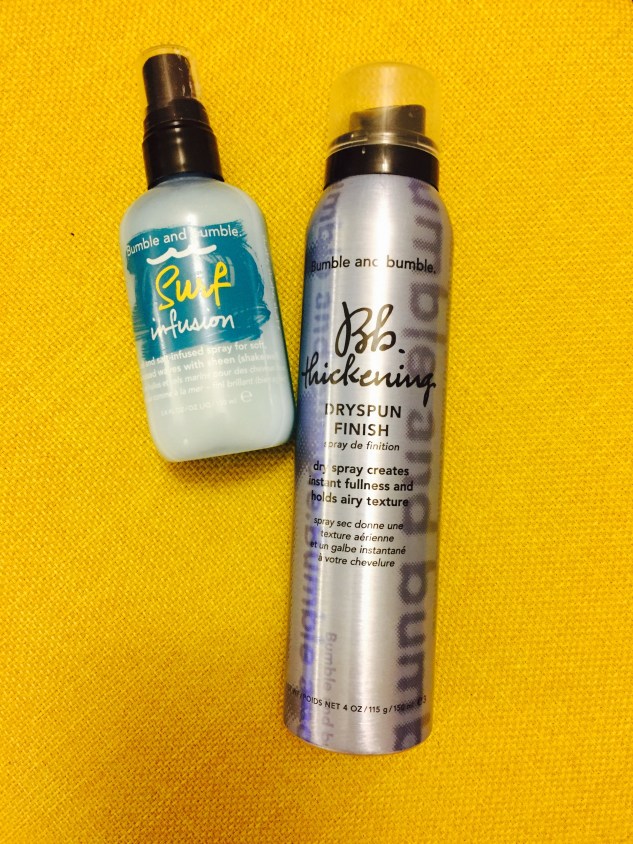
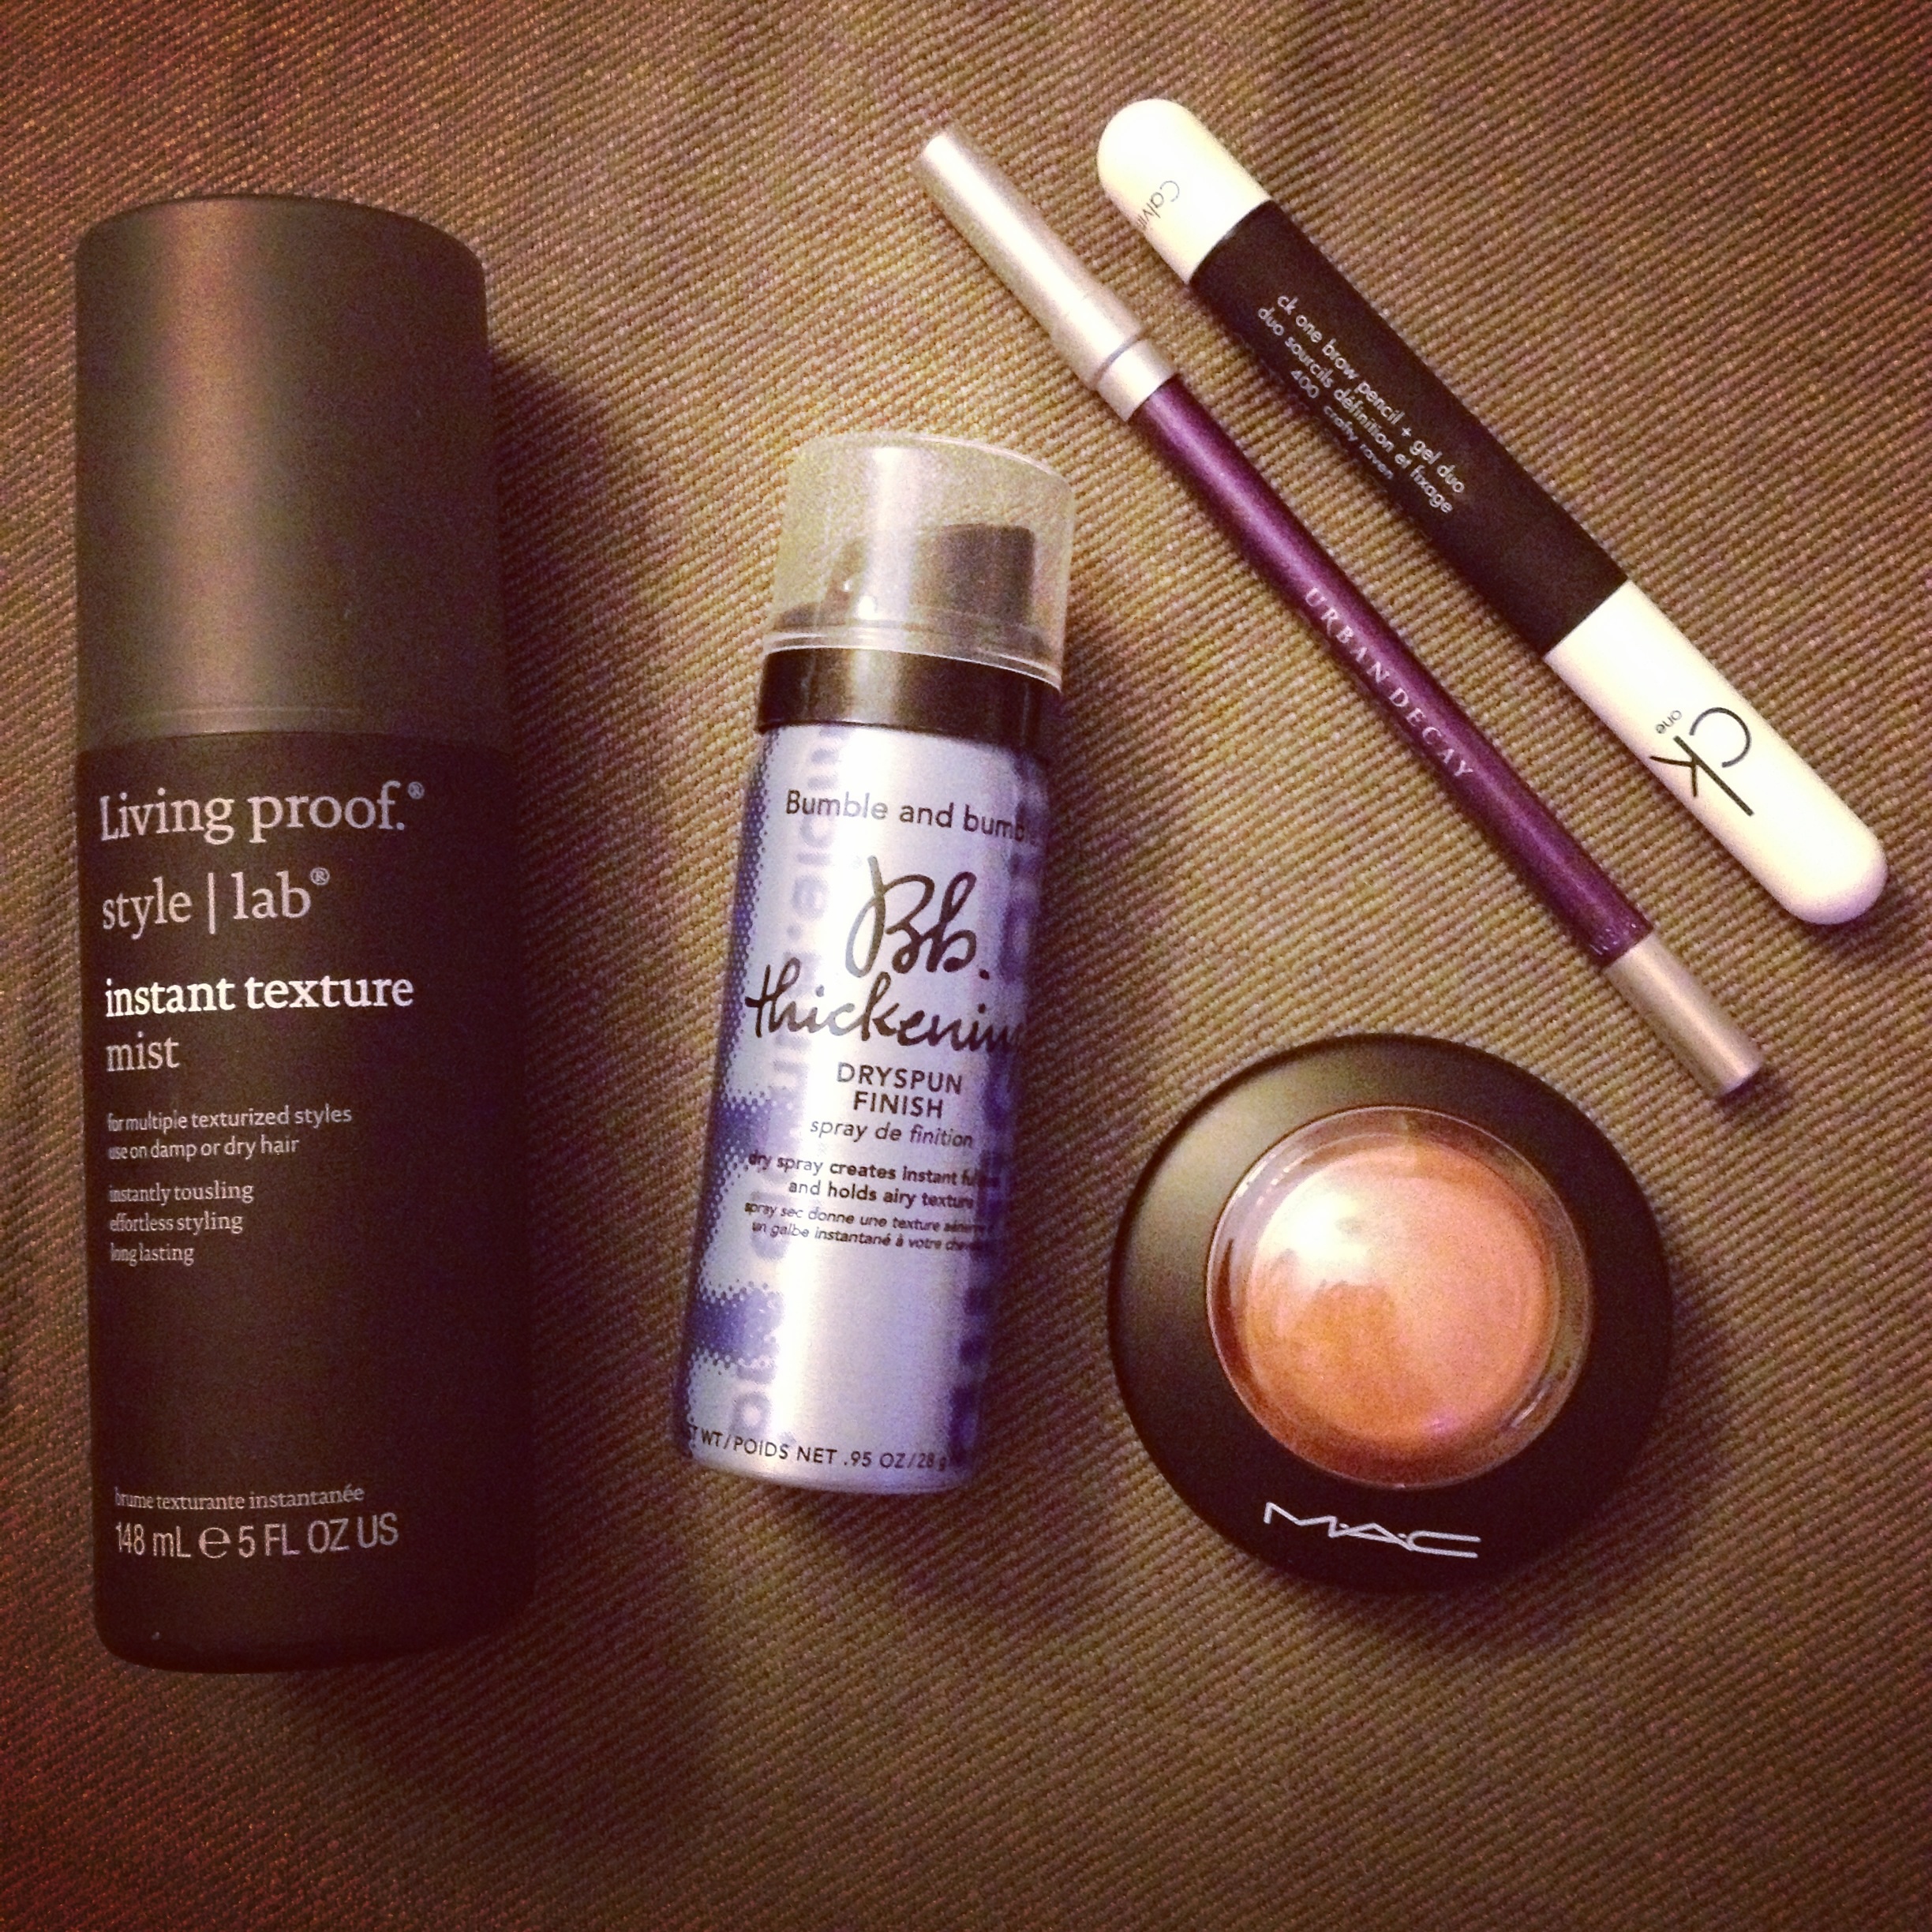
For styling, I’m a sucker for anything to do with texture.  Living Proof’s Instant Texture Mist is great for giving that pliable “chunk” feel that I love for hair, and I also like Bumble And Bumble’s stylers like their Dryspun Finish and Cityswept Finish.  If it mattifies, gives texture, or extends a blowout, I’ll try it.  Anything for the second- or third-day hair look.  I like Oribe’s Apres Beach Wave And Shine Hairspray too, though my hair does “beachy” really well on it’s own.  I love Oribe’s products for their scent.  And the best dry shampoo in the world is Klorane’s, hands down.  The non-aerosol kind has stretched out so much time between washes for me.  It can make your scalp itchy if you put too much on and don’t brush it out, but it’s still the best.  The drugstore kinds suck.  If I want a smooth or blown-out look I’ll use R&Co’s Jackpot Styling Creme.  The scent is intense but it stretches out my hair beautifully, and the effect lasts around three days.

I got into the R&Co stuff because my salon started carrying it.  I go to Salon 9 in Orange, and I’ve been going to Justin Kamm for nearly ten years!  He’s a genius.  He teaches workshops and is part of the cutting team for Davines.  We finally, FINALLY cut my hair past my shoulders just this weekend.  I’ve always had my hair long or mid-length, because I love long hair and I love playing with it.  I miss topknots and ponytails and long waves, but the bob that Justin gave me feels so right.  It’s good to do at least once, and I’m surprised at how comfortable I feel with it.  I feel reeeeeally French.  And the best part is, all those texture products work so well with this cut.  I still put a bit of wave in it with my Hot Tools iron, but roughing it up with some kind of product gives it that grit that I’m always after.

image3

MAKEUP

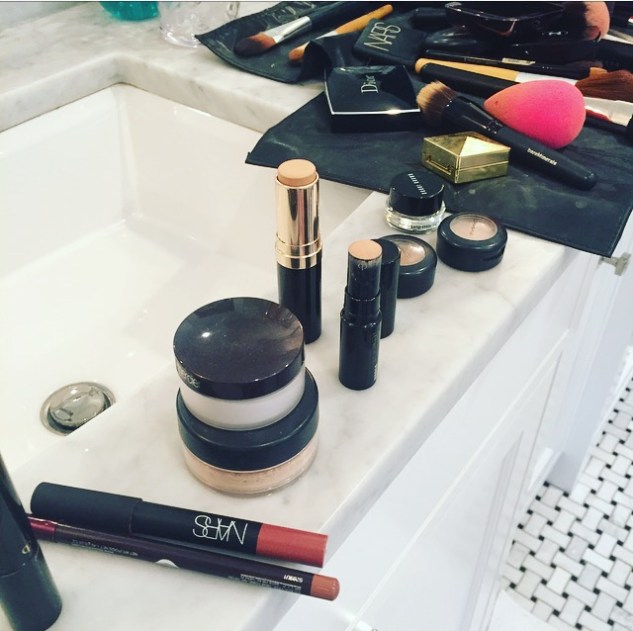
Makeup is tricky.  I’ve tried a ton, but over the years I’ve come to find that I’m actually really picky and haven’t tried quite as much as other people (which is encouraging).  Makeup is expensive, and I take forever to run out of anything so buying too much is a really wasteful choice for me.  I don’t use primer much, but I like BeneFit’s The Porefessional when I do makeup for brides.  It feels silky.  I like to use Clarins’ Beauty Flash Balm on myself and then immediately put on powder or foundation once it absorbs.  I prefer this to primer.  It sort of gives skin a brightening effect.  For foundation, I love Bare Minerals’ Original SPF Foundation because it still leaves a glow.  I don’t like a matte skin finish; I’m all about dewy skin and mattified hair.  The opposite feels too Vegas or Miss America for me.  If I want a liquid foundation, Lancome’s Teint Miracle is nice but I still haven’t landed on a favorite.  I just don’t think I like liquid foundation.  I even have a BB Cream that I like but I just don’t use it too often.  You can’t escape the feeling of liquid makeup on your face, which I hate.  I immediately want to take it off.  Concealer is nearly always Yves Saint Laurent’s Touche Eclat in Luminous Vanilla.  I used to hate it, and I’m not sure why.  It’s the most lightweight formula I can find that still gives coverage.  However, I’m not too concerned anymore with getting rid of dark circles anymore because for some reason, I like them now.  They seem to give a touch of character.  A heavy concealer under the eyes looks too finished for me.  You need that bit of wear in your face.

NARS Bronzer in Laguna is pretty standard, and I’ll try almost any blush.  NARS has the best ones.  I’ve liked their creme formula in Lokoum for a long time but I think it’s discontinued.  Their other powder shades are bonkers; I love Exhibit A and Liberte.  MAC has a gorgeous one from their Mineralize line called Warm Soul.  It super pretty for everyday, but mineral blush on top of mineral powder it can make your skin look funny.  I like it on bare skin.  MAC’s Plum Foolery is also good; I wore it for my wedding day and my mom wears it, too.  I have a couple Chanel blushes too, but I hate to admit that I bought them because they were honestly just too expensive and frankly, MAC and NARS make better ones.  The Chanel ones have perfume in them.  You feel glamorous putting them on, but they’re a murderous, stupid splurge.  Spend that kind of money on groceries or not at all, for God’s sake.

Eye makeup is a journey for me.  I take forever to decide what I’m going to do with my eyes.  Eyeshadow feels like such a commitment, which is probably why I wear it the least out of anything.  It’s takes me a lot of time and concentration, and I always need to put shadow primer on if I’m going to do it because it makes such an undeniable difference.  I think I like purple shadows on myself best.  It’s just enough of an interesting color to feel special, and it does wonders for brown eyes.  MAC’s Sketch and Embark are good.  I bought the Embark because it’s the closest thing I could find that matches this special edition Victoria’s Secret eyeshadow I have.  Christian Siriano from Project Runway did a collection for them a long time ago and it included this eyeshadow that is literally perfect.  It’s matte, smooth, has amazing concentration, and is this deep purple-brown shade called Royalty that, of course, ended with the collection.  I’m going through it really slowly, but I love using it for smokey eyes.  A lot of that stuff with a ton of MAC’s kohl liner in Feline, and boosh- I feel like Catwoman.  If I’m really going for it I’ll use Urban Decay’s eye pencil in Vice, too, and smudge it out.  The best is when a smokey eye looks sweaty and sparkly, like a hazy night at Studio 54 in 1978. This pencil does that.  Oh and my mascara is pretty much exclusively CoverGirl.  I swear, theirs are the best.

Lips are simple.  I do very little, unless it’s something like a red lip.  I like lip colors that look like just a bit of something, because I usually like to focus on my eyes.  A lot of times it’s just a few swipes of Burt’s Bees.  Everything I like tends to be pinky-nude.  I’ve liked Dior’s Addict lipstick in Tulle, L’Oreal’s Colour Riche Balm in Nourishing Nude, and Yves Saint Laurent’s Rouge Pur Couture Glossy Stain in Nude Provocateur.  I guess I gravitate toward balm stains, or gloss balms, or all those hybrid formulas we see these days.  Nothing too lipstick-y.  An exception would be NARS’ lip pencils.  Those are brilliant.

Processed with VSCOcam with f2 preset

Oh!  I almost forgot about brows.  I use one thing- CK One’s Brow Pencil and Gel Duo in Crafty Raven.  I like thick, groomed eyebrows, but I hate how many rules and standards there are with them these days.  They have to be perfectly shaped, tapered, filled in, not too thin, all that.  I’m not into it, and same goes for the contouring craze.  It’s just too much, too Kim with all the banana powder and shading and all that.  I’m not into tricks that transform your face into another face, though it’s cool that it can be done.  I like to look like myself, but with a bit of a wink I guess.  That’s the best for me, at least.  xo, MR

Four Easy Change-Ups. Or, How Not To Be Bored With Your Look.

When I know I’ve got a night out coming up (which in my case, is more like just going to a movie), I try to plan for at least two hours of time to get ready.  Why such an unreasonably long amount of time, you ask?  Well, I want to the time to go through the slow, slooooow process.  I want to turn on some I Love Lucy, I want to perhaps have some coffee in front of me, I want to think about my hair (which will probably end up in waves, but hey, it still takes time), I want to think about my makeup, and I ultimately want to think about it all in conjunction with my outfit, which is the hardest part.  Pulling an outfit together that I’m truly satisfied with is tough as getting a two-year-old completely happy with the toy in front of him.  So combine all of these factors together, and you can see why I want a maximum amount of time.  I want to be able to take as long as I need making decisions about whether I’m wearing my leather leggings or jeans, heavy eyeliner or an eyeshadow-based look, if I’m going straight or wavy with my hair.  The decision-making is the longest part of the process.

So, when it comes down to that decision-making, what are some options that I can have up my sleeve that won’t involve the same stuff I always do?  Or at least, just some quick ways to spice things up?  Here, four of my favorite quick strategies for putting a twist on your typical look:

faves improved

1)  Instead of using brown or black, use a colored eye pencil to create a new version of a smokey eye.  Start by mattifying your eyelid with a primer like BareMinerals 5-in-1 BB Advanced Performance Cream Eyeshadow.  Then use a colored eye pencil to draw a thick, thick line across your upper lid, and do the same on your lower lid though not quite as thick.  Fill in your whole upper lid using the pencil.  Next, use either a swab or a rubber tip (many eyeliners come with them attached) to smudge out the liner.  Smudge it up into the crease and out toward the end of your eyebrow.  Smudge the bottom lid as well, and finish with tons of mascara.  I personally love Urban Decay’s 24/7 Glide-On Eye Pencil in Vice; a sparkly, bright purple from this incredible range of colors.

2)  Pick a new shade of blush.  Find yourself gravitating toward the same blushes all time time?  Maybe you always do pinks, or you stick with corals, or perhaps you only ever wear bronzer.  I challenge you to try something completely different.  It’s surprising how much it can change the character of your makeup.  Go for a shade of plum, or something bright and shocking like NARS’ Exhibit A.  I’ve been loving MAC’s Mineralize Blush in Warm Soul as a different take on something both coral and bronzey.

3)  Up your brow game.  Thanks to Cara Delevigne and a slew of models following in her wake, bold brows have become the crowning glory of a full makeup look.  Heck, I would even say that nowadays you can get away with just filling in your brows and leaving the rest of the canvas blank.  Do the tiniest bit of necessary plucking, and use either a pencil or gel to fill in and even out the whole brow.  Use a wax or a gel to set them as well, and brushing the brows upward these days is a super fashion-forward look.  Full, well-groomed brows do so much to frame your face; I would challenge you to even try just taking care of your brows and leaving the rest to speak for itself.  It’s very French (and very easy).  I love using CK One’s Brow Pencil and Gel Duo in Crafty Raven on my own set.

4)  Instead of focusing on shine, try a mattified texture with your hair.  It’s easy to fall into the same routine of slathering on a frizz-fighting serum and using a paddle brush to try and create pristine shine with your hair.  However, there’s an arsenal of products out there these days that will lend a volumized, second-day, beachy texture to your hair that has its own kind of modern, rebel appeal as opposed to polished, ladylike shine.  IThey also make better use of your own texture! love Bumble and Bumble’s Thickening Dryspun Finish and Living Proof’s Instant Texture Mist.  You can rub a bit of the latter in while your hair air-dries, or you can scrunch it into your hair afterward.  The Bumble product does best on second-day hair or after you’ve blown it out to add rough dimension and volume.

Let me know what you’ve tried for a quick and easy change-up when you’re ready to step out.  Getting ready for a night out (or what usually looks more like a barbecue and some It’s Always Sunny’s in a friend’s backyard) has already become a rarity for me; using my creativity to the best of my abilities shouldn’t be.

Oh!  And I realized that I haven’t followed up on my last post!  I present, what I decided to do with my hair-

New hair

You guys!  I look just like her!  Oh just kidding.  But this was one of my favorite covers in a long time, and I submit this as my tribute to one of my favorite actresses, Jennifer Connelly.  My color genius, Justin Kamm, helped me choose a warm, rich brown shade while weaving in a few lighter, almost auburn-flecked highlights (which I confidently declared as “toffee”) to add some dimension.  It will probably lighten up a bit over time, but I’m loving the change.  I feel like I need a bit more makeup with darker hair, but I can’t say I have a huge problem with that.  xo, MR