Daytime Makeup- Simple, But Significant

It’s been two weeks since my last post, and I guess I’ll claim the excuse of having my birthday as a valid reason for not writing.  But seriously!  There’s been plenty going on.  And to complicate things just a bit more, my husband and I now use an HDMI cable connected to my laptop when we want to watch TV.  So, if we’re watching something, I can’t write.  That may sound like a silly problem to you, but I am actually most comfortable with writing if I have a program on in the background.  Yes, I blog and watch TV at the same time.  My modus operandi usually involves one of my I Love Lucy DVDs playing in the background while I pound furiously at my keyboard.  Or my Doug DVDs.  Did I just admit I own Doug DVDs?

Anyways, I’m kind of just giving a variation on a theme here today- another simple, everyday makeup look.  I don’t have a ton of unique inspiration at the moment so I figured I’d just share the easy stuff I’ve done lately.  And frankly, this is my favorite stuff to do on myself or anyone.  Easy peasy.

IMG_2157

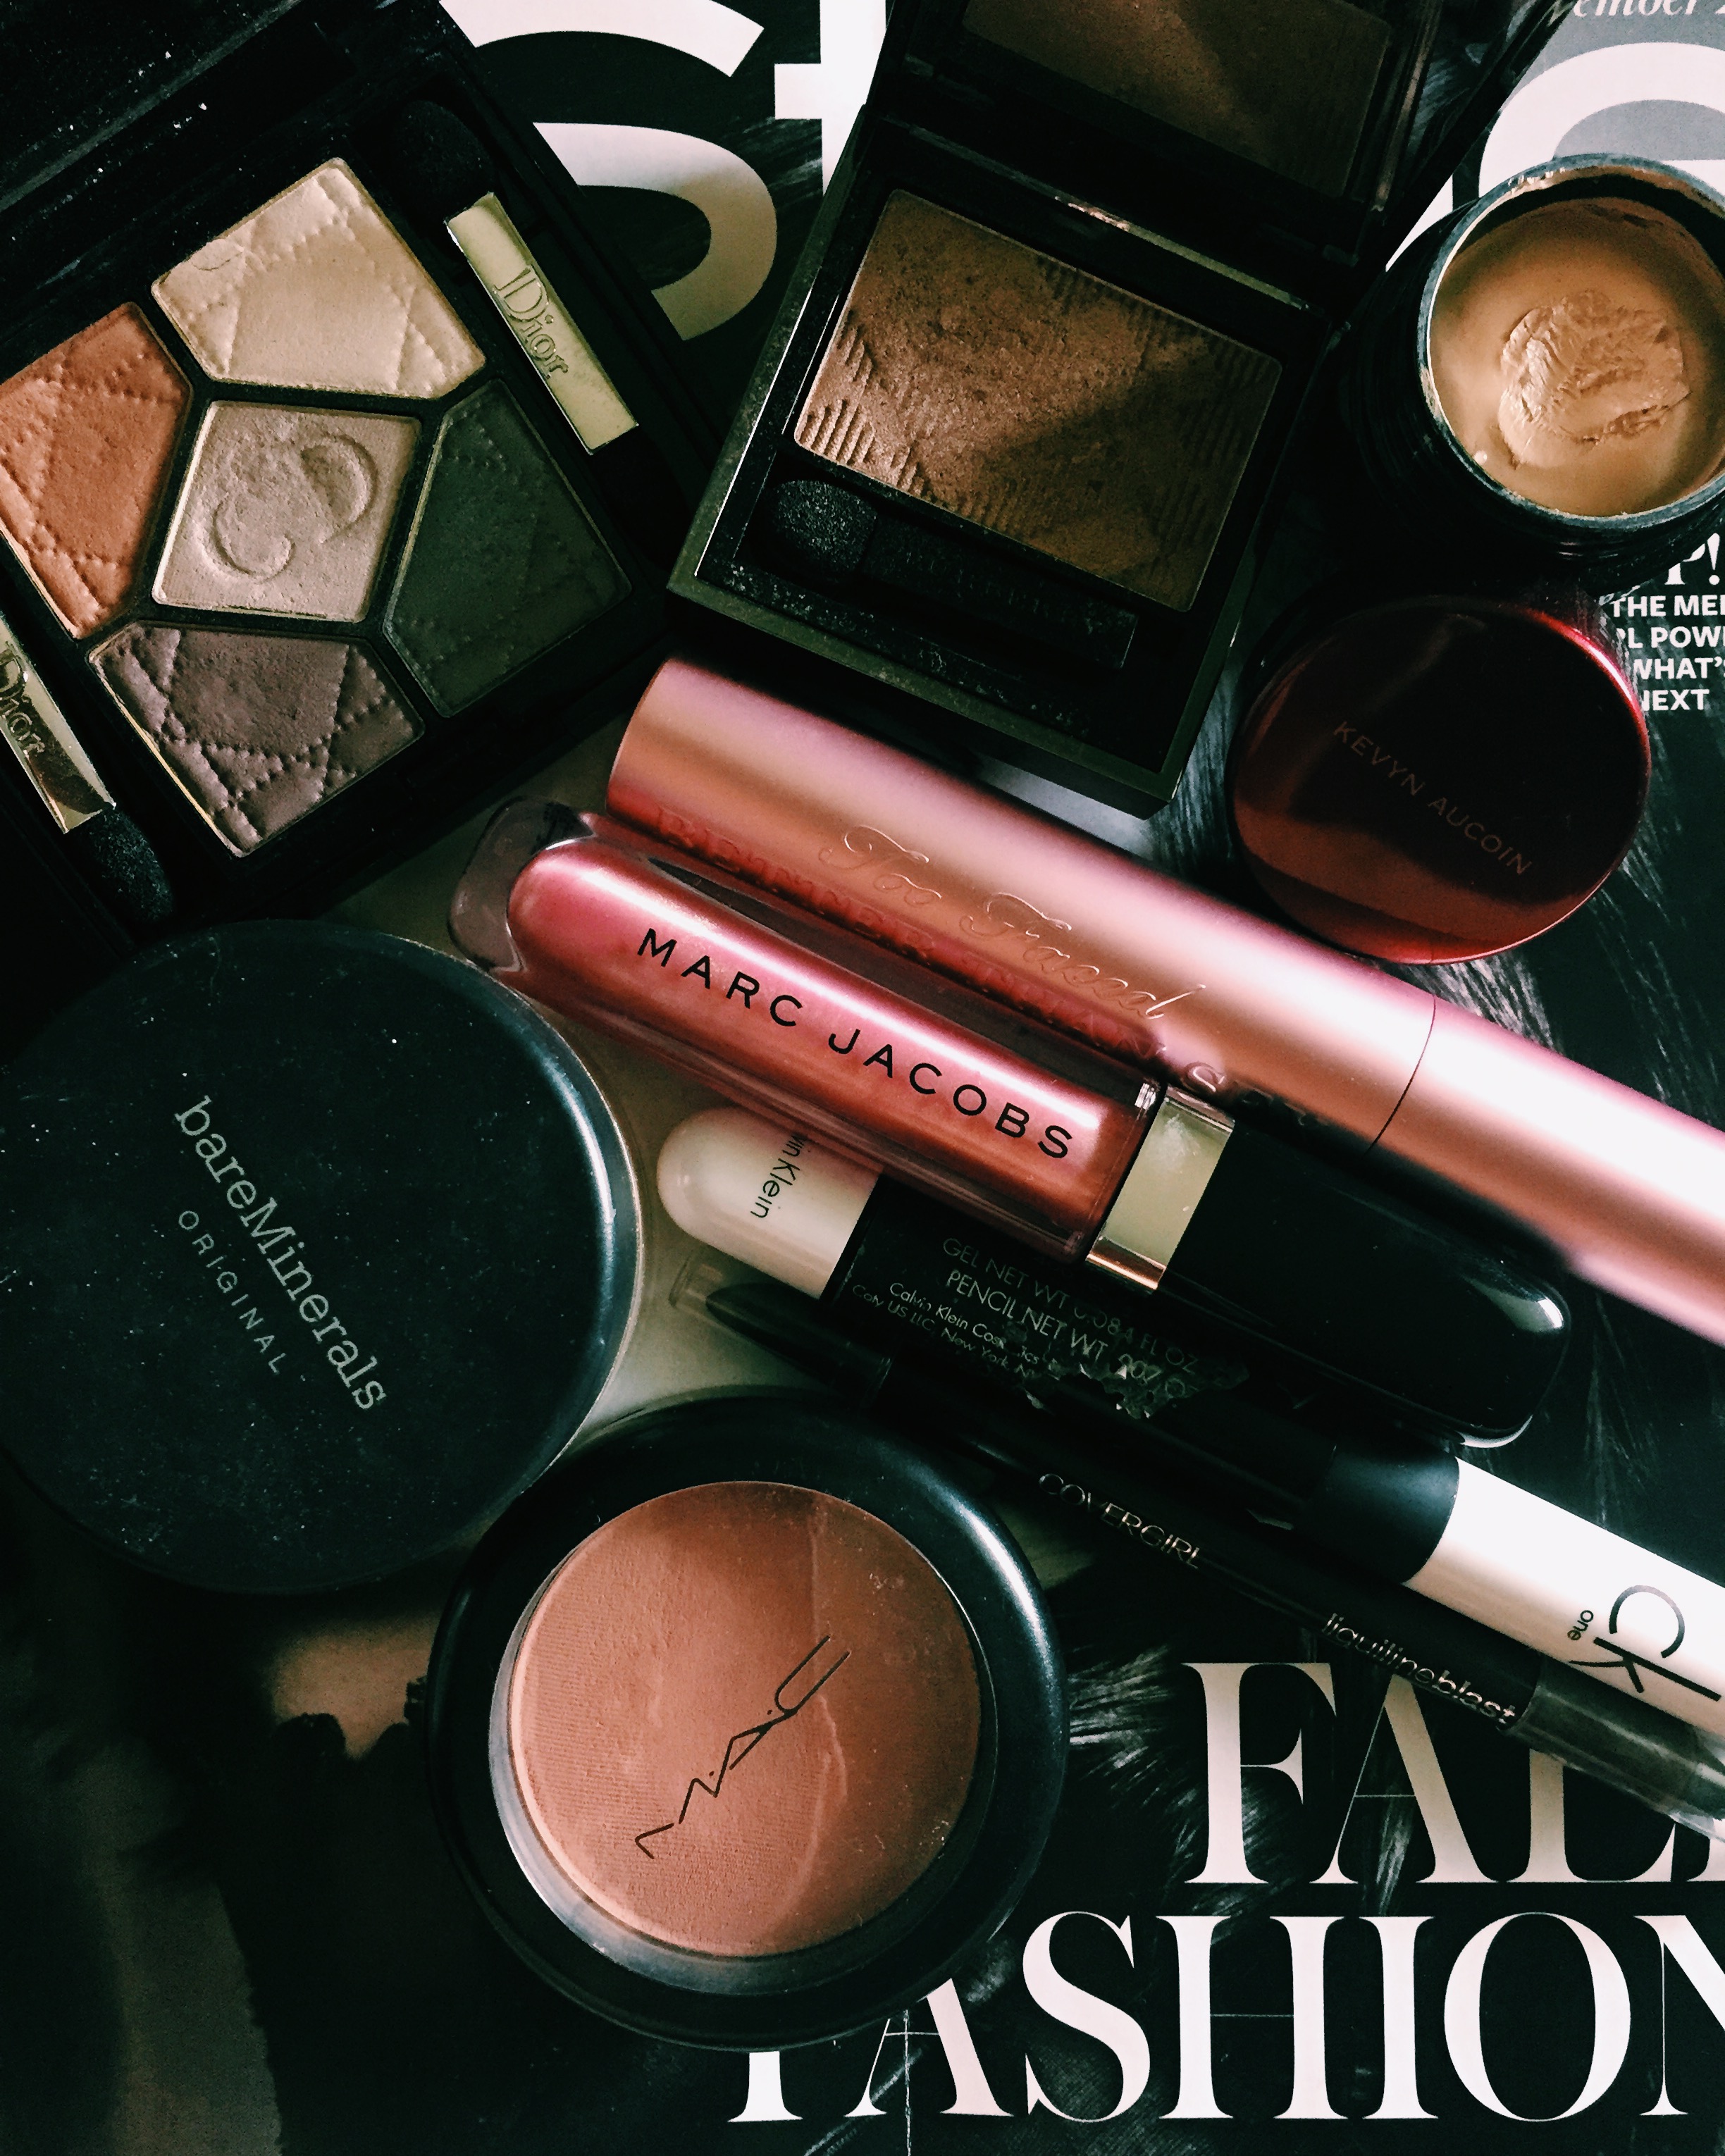
Again, we see that even though this look is “no makeup” inspired, there is actually plenty of makeup that goes into it (relatively speaking).  I’ll start from the beginning:  I cleansed my face and then gave my face a couple spritzes of Lush’s Eau Roma toner water.  I then applied a beautiful essence from May Coop.  Other skincare products layered on top of this just seem to make your face glow brighter than a comet.  Because it was already near evening by this point I chose not to use any other serum or moisturizer with sunscreen.  Instead, I applied Clarins Beauty Flash Balm.  This stuff is a little hard to define because it’s not exactly skincare, but it’s not really makeup either.  It’s this fun little enigma of a product that makes getting ready feel a bit more glamorous, though!  I use it as a primer; I applied a thin layer all over my face and then proceed with makeup right away.  It creates a dewy canvas for makeup, and it brightens and blurs the appearance of pores and imperfections.  It also feels cooling, and it smells fresh and floral.

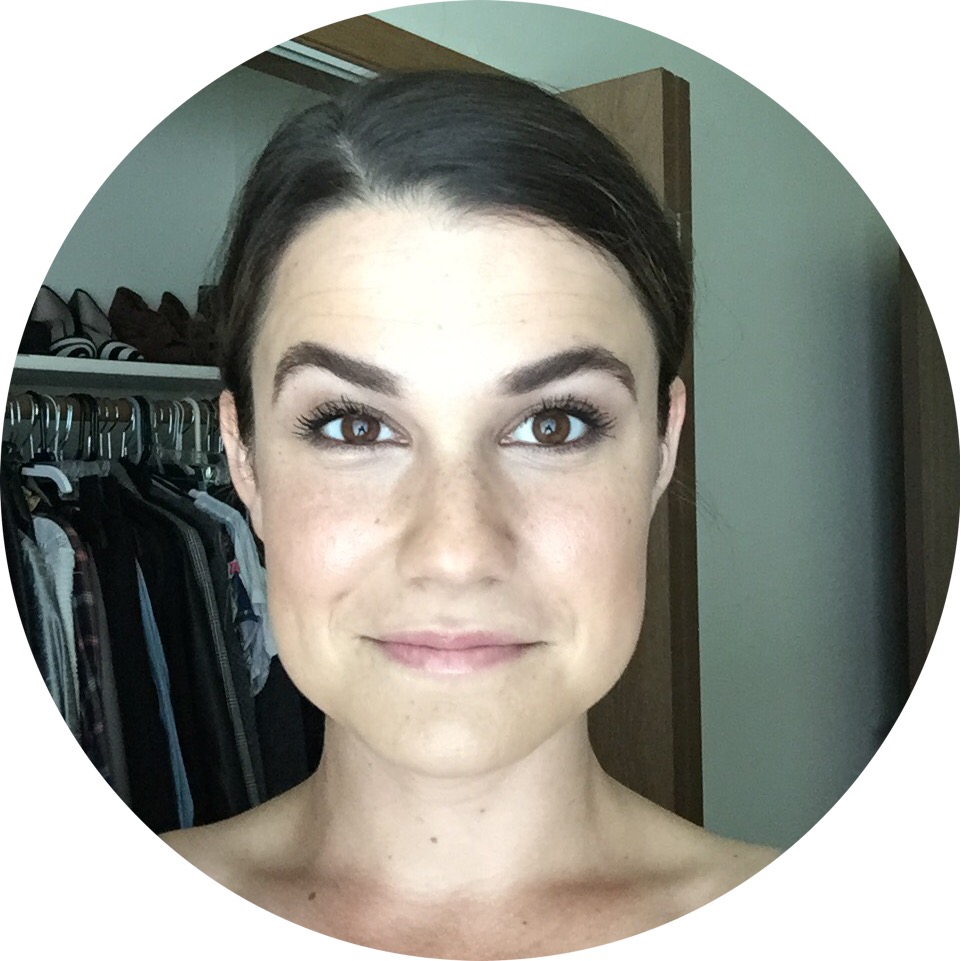
After that, I went for the natural-looking BareMinerals Complexion Rescue in Buttercream and undereye concealer from NARS (and can I just say that I love my shade names- Buttercream for BareMinerals, Custard for NARS).  On my undereye area, I used my new Laura Mercier Secret Brightening Powder for the first time.  I had asked a friend a couple months ago what she used for her undereye area because whenever I see her, there’s always this faint, flattering shimmer around her eyes that seems to mask dark circles and give the area just the right touch.  She directed me to this powder, and it really is lovely.  I also love that it sets your undereye concealer; I’ve needed something for so long to stop my undereye concealer from creasing.  It also seems to prevent mascara from smudging down there, too.  I wore Too Faced Better Than Sex mascara (yes, I know *eyeroll*) and while this stuff is amazing at building your lashes, it smears on to my lower lid pretty often.  That didn’t happen with the Laura Mercier!  It didn’t happen the next day either, when I tried it again.  My eyeliner is courtesy of the classics: Bobbi Brown Long-Wear Gel Liner in Black, and Stila Stay All Day Liquid Eyeliner.  I use a very thin angle brush when applying the Bobbi Brown, and I use it to essentially draw my wing, too.  The Stila blackens it, sharpens it, and fills it in.  Here’s a look with my hair back (with both of the following pics sans filter).

IMG_2156

One thing I’ve noticed is that I’ve gotten so pale out here that most of my makeup is now just a teeny bit too dark.  If you see my face compared to my neck area, you can kind of tell.  Oi.  It is just too dang dark out here, and it’s May!

I chose to use some of the lighter shades in the Kat Von D Shade And Light palette, to help with the color of the Complexion Rescue.  This product is beautiful in that the shades can be very helpful and the textures are super creamy and yummy.  However, you really don’t need a contouring palette, in my opinion.  I’ve had a lot of fun with this one and it’s been worth it to watch a couple YouTube videos to see what others do so I can get the most out of it, but I think you can get away with just bronzer and a shimmery highlighter to get the same basic effect.  One thing I don’t like about using the lighter shades in a contour palette is the fact that they mattify things.  You know I like a glowing finish, and using the lighter shades in the Kat Von D took all the shine of the Clarins and Complexion Rescue away (and to be specific, I used the yellowish banana powder one on the middle-top).  You then need to reapply highlighter on top of that if you still want shimmer, so it can create a redundant process.  I prefer the darker shades meant for contouring.

For blush, I dusted NARS blush in Liberte all over my cheeks.  I used my trusty-and-now-discontinued CK One brow duo for my eyebrows.  I still am not sure what I’m going to use as a replacement for this, but I’ll probably just sell out and go the Anastasia route.  And lastly, for my lips, I just used my longtime favorite- MAC Cremesheen Glass in Strictly Plutonic.  It’s a peachy-pink neutral, and the formula is so much less sticky than the classic Lipglass.  I love it so much, but of course it’s from a limited edition collection so never again!

IMG_2158

This is kind of the makeup I do on a more regular basis.  I’ll switch out the type of foundation, or change the shade of blush, or perhaps play around with eyeshadow (that’s getting serious), but this is a pretty straightforward look for me.  I do give myself props for continuing to improve my cateye, but in the future I’ll continue working on making things pop a bit more.  I mean, I like simple things, so simple makeup really is my jam.  In the words of Don Draper, I like to keep it simple, but significant.  xo, MR

Average Makeup For Average People!

If you know me, you know I’m a huge fan of trends.  I always look forward to what’s coming out next season, and I’m the first one to jump aboard the bandwagon when everyone starts wearing their hair a certain way (hellooooo, ombre for life).  And I love it!  Trends are a fun way to keep my look dynamic, and I find myself trying things I wouldn’t normally try once something pops up on the trend radar.

However, when it comes to the beauty trends I’ve seen floating around Instagram these days, I’m not as keen. You’ve heard me say these things before- Kardashian-style contouring, so-called strobing (which is just a trend word for highlighting, which has been around forever), exaggerated lipliner, and the bright red cream blush that is suddenly being applied to everyone’s undereye area because it apparently cancels out green undertones … why?  I will admit that all of these tricks can be exciting when it comes to the transformative power of makeup, but it’s become popular to go through these complex makeup routines for everyday life.  The Kardashian-Jenner women look fully made up and one hundred percent camera ready every single day, and by sharing all of this with their followers, they have caused millions of other women to aspire for the same.

However, this is not a very realistic thing for most folks to aspire to.  Wearing the kind of makeup each day that is meant for HD cameras is not only a lot of look for many people, but it is also difficult to put into practice.  It can be time consuming and expensive to apply a full routine of makeup each day like what we see on Instagram, and many would find it uncomfortable to wear that much to work or just out running errands.

So what might a full (keep in mind, full) makeup routine look like for the more average person?  One that still ups your typical makeup game, but doesn’t require any red undereye concealer or even false lashes?  We can get to all of that, but let’s start with something basic.  It is presumptuous of me to believe that I have any answers, but here’s my stab at it:

  1.  Start by prepping your skin.  Got a good moisturizer?  Slather it on.  Or a sunscreen?  Serum?  Whatever it is, put it on to get your skin moist and ready to receive product.
  2. .Take either your liquid or powder foundation and use a brush (fluffy or foundation, depending on whether you’re using liquid or powder) to apply a light layer.  Be certain that there is no line of demarcation on your jawline.  In other words, blend, blend, blend so there is no visible line where the makeup begins or ends.  Check your hairline, the smaller areas around lips, and your nose!
  3. Use an eyebrow pencil no more than two shades darker than your natural brows to lightly sketch in any gaps or anywhere that you’d like more definition.  Use a brow brush to brush them up, and then use a brow gel to set them.
  4. Take a blush or powder that’s just a shade or two darker than your skintone and, using a blush brush, make light, consistent strokes just beneath your cheekbones (and I used MAC’s blush in Buff, pictured below).  This will create some light definition.  I typically like to limit my contouring to this.  You can also use bronzer for this step.  Just be sure to blend well.
  5. Next, apply a cream concealer to the couple darkened spots on your face such as the undereye area and beneath your nostrils.  I like NARS Creamy Radiance Concealer, Kevyn Aucoin’s Sensual Skin Enhancer, and Yves Saint Laurent’s Touche Eclat, which all work as both concealers and highlighters.
    1. Here’s where I add a bit of highlighting- Along with the darkened places of your face, apply small dots of concealer to areas where light hits your face naturally.  See my picture below for a reference.  I’ve actually mimicked Chrissy Teigen’s methods here and I’ve found that these little spots work nicely.  I also added some around the lips.
    2. Then, use a concealer brush (or your finger, which will work) to blend in the concealer.  Try your best to find natural light when blending so you can see clearly.  It is hard to blend accurately and thoroughly in a poorly-lit bathroom.  Your face should appear to have some nice dimension and should appear highlighted, even glowing.  Obviously, the picture below is pre-blending.

IMG_08646.  To add some extra shimmer (or “champagne pop” as some have called it), take any shimmery highlighter such as MAC’s Mineralize SkinFinish in Soft And Gentle and apply it to the apples of your cheeks, your forehead, and a bit on your chin.

7.  For your eyes, I like to choose a neutral but flattering eyeshadow such as Burberry’s Pale Barley and blend it all over my lids, stopping at the browbone.  For just a little extra drama, I line my eyes with a darker, matte shadow like the bottom-left shade you see in the Dior Grege palette you see below.  Line the upper lid, line the lower lid.  Add some brown eyeliner to the waterline.  I’ve used the same CoverGirl one for a couple years.

Processed with VSCOcam with c1 preset

8.  The one thing I’ll go overboard on is mascara.  I take as much time as I want on this.  However many coats, however many different kinds.  Everything else is so neutral and light that I like to add that small dose of glamour with a ton of thick lashes.

9.  And finally, for lips, I just add a gloss!  No lipstick, no liner, just gloss.  Pick any flattering gloss you like.  I’ve been using Marc Jacobs Enamoured Hi-Shine Lip Lacquer in Love Buzz.

IMG_0876

Give all this a shot.  There’s no filter here, so this is how it turned out in natural light in front of a window.  I’d say the steps that make this a little more difficult for those who’d call themselves “beginners” are those involving the concealer as highlighter.  You can always skip those steps and just start with concealing the darkened areas or problems spots (like zits), and add some shimmery highlighting powder to your cheeks.  Play around with it, and let me know what works.  xo, MR