What I’m Using: An AM Routine

The last four years in Illinois really enabled me to think through the little things that make me, me. What do I like and don’t like? What kind of routine am I currently capable of, and what kind of routine do I wish I could have? How healthy am I, and what could make me healthier? It was all sort of laid bare before me. We’ve only been back in California for two months but we’ve jumped head-first into an extremely busy season. And my routines have shifted dramatically, partly out of obligation and partly because I think I’m just healthier. My job has me starting work at 7AM, but I see a lot of faces each day and need to look more presentable than not. I also have a kitten that practically tries to murder me once the lights turn on and she gets in the room, so once I’m up, I am up. Whereas in years past a 5:50am alarm would’ve been a real struggle, I’m managing to make something out of the half hour of consciousness I’ve got before driving to work.

If I’m lucky, I’ve gotten up early enough to quickly rinse. I’m a night shower-er but if I can throw myself under some water in the AM I feel my absolute best and most awake. It’s not necessary to me, but going to work feeling totally clean is the best. It’s the ultimate feeling of preparedness. I’ll cleanse with Glossier Milky Jelly and spritz on a Lush toner while my face is still wet. I wait for that to dry a bit and pat on some of Fresh Black Tea Kombucha Essence- very expensive but I hate to say it, I think it’s making the biggest long-term difference in my skin. I’ll wait for makeup after that and not add any more skincare layers. Otherwise my face feels too moist and I feel like I’m sweating.

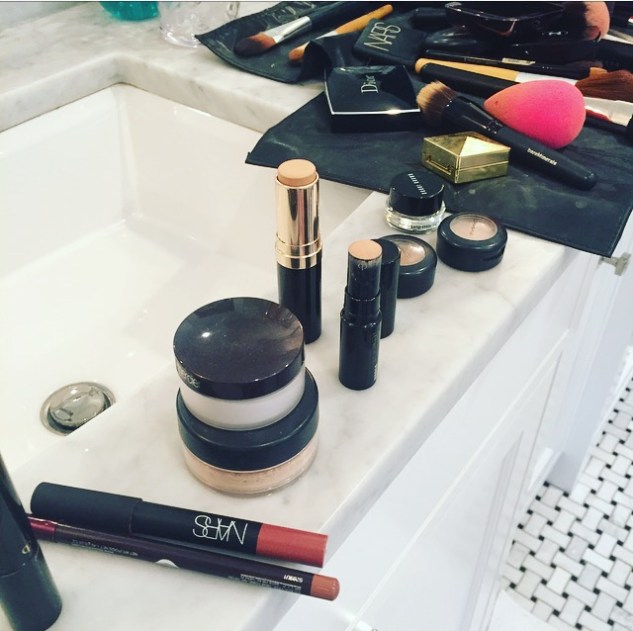
Makeup is fast in the morning. I put a bit of NARS Creamy Radiant concealer on my undereyes and on the inner corners of my eyes, along the sides of the bridge of my nose where it’s always really dark. I call those the little “caves” of your eyes- they get so dark and that’s the key spot to brightening them. I also put some under my nostrils and a tiny bit around my lips where things are discolored. I blend that all out with my fingers and maybe add some BareMinerals Complexion Rescue around the rest of my face. If you like that dewy, glowy look, this is the stuff for you. Or instead I just blend out some Glossier Stretch concealer where it’s needed. I go by the KatieJane Hughes method and treat that stuff like a solid tinted moisturizer.

IMG_8549.jpeg

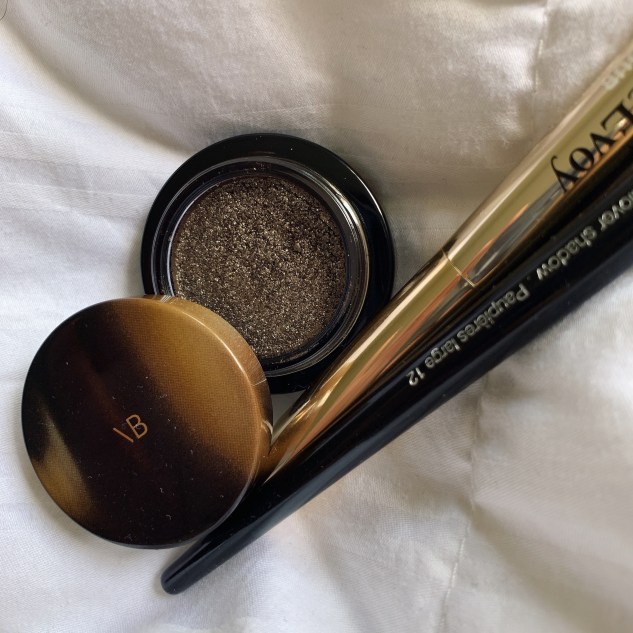
Eyeshadow is typically something I skip because I get too ambitious too quickly with it, but if I have two minutes I’ll buff out a couple creamy, sparkly brown shadows with a cream shadow brush. I love Maybelline’s Color Tattoo in Bad to the Bronze mixed with Trish McEvoy’s cream shadow stick in Topaz. They’re really pretty blended out together all around the eye. I’ve also just tried the crystal-infused eyeshadow from Victoria Beckham’s new line in Mink and it’s crazy sparkly and flattering. Basically anything brown or bronze with sparkle works. The mascara that packs the fastest punch is Flower Beauty’s Warrior Princess one. I’ll use CoverGirl Clump Crusher to separate and define a bit, but the Flower one gives all the impact. And I never use eyeliner in the morning. That requires like, three products for it to be perfect.

Blush is either a cooler pink or a warmer shade, which then determines my lip color because we can’t have things clashing too much. NARS Exhibit A gives the most impact with the least amount of product. Anyone else weird about using only the least amount of product possible? I feel like I’m trying not to run out of things but then I end up with makeup that’s three years old and still looks unused. It’s like a weird compulsion of mine.  But anyways, I could pick literally any blush and I’ll be happy with it. My lips usually end up with Glossier Generation G lipstick in Cake or Burt’s Bees Tinted Lip Balm in Hibiscus. I like Charlotte Tilbury’s Matte Revolution lipstick in Very Victoria, too. I prefer lips without much shine for everyday. Gloss is a such a look to me.

A76EB96E-4C39-4E27-8A67-DB7B503D5E9B.JPG

If I have any more time left I’ll add highlight with MAC’s Mineralize powder in Soft and Gentle and maybe some contour with Kat Von D’s Shade and Light palette. I’ve had this angled brush from Sonia Kashuk forever that absolutely perfect for contouring. It’s old and there’s nothing like it.

Oh and almost forgot- eyebrows. If I leave the house without any other makeup on, it’s fine- but my brows are always fixed up. I use Maybelline’s Brow Drama crayon to fill in any sparse spots and set them with Glossier Boy Brow. I don’t pluck them, I don’t do anything to them other that.

Beyond all this I just add perfume. That and eyebrows are the essentials for me. There’s something humanizing about perfume; it makes you feel like you have a personality and perspective. Everyone says things like, “That’s a mood” or “That’s a vibe” but my mind always wants to say, “That’s a perspective.” I have several different roller balls so I just sort of choose what suits me that day, but nothing too powerful. I’m finishing off My Burberry Black right now and just bought a bottle of Hugo Boss The Scent Private Accord. It’s sweet but very warm.

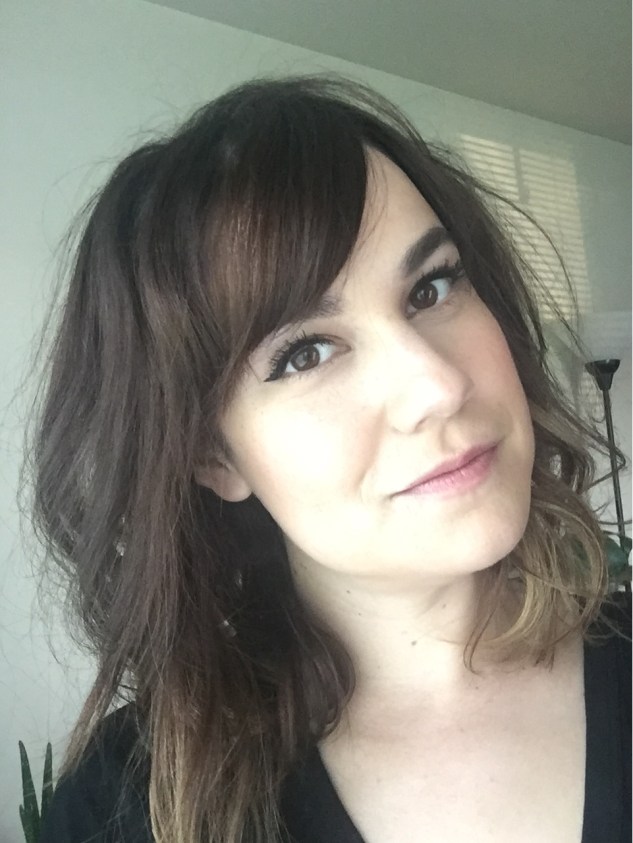
If you’re interested in seeing the full look put together, my July post features a selfie. But be aware- my hair is also done, which really doesn’t happen on weekday mornings. That would require something like a 5:15am alarm, and we all know that’ll never happen. xo, MR

Makeup For A Night Out- My Friend Meg

It’s been way too long since I’ve done someone’s makeup for a special occasion; my last real client was before our move out here!  The only thing that’s come close is when I had the pleasure of doing a trial run for a beautiful girl attending her senior prom here in Illinois, but her plans fell through at the last minute.  So, since July of last year, it’s really just been me tending to my own face (which begets way too many selfies, let me tell ya).

So you can imagine my excitement when my friend Meg, whom I’d gotten to know through church, asked me to help her with both makeup and hair!  I admit I was a little nervous because it had been so long, but I was too excited to work with someone again to let the nerves bother me.  Meg was attending a benefit event for the Rehabilitation Institute of Chicago, and the cocktail attire dress code provided the perfect excuse to play around.

fullsizerender-2

I prepped Meg’s skin with Glossier’s Super Bounce serum, which perhaps turned out to be her favorite product we used that day.  Luckily, even though I’d brought my own kit with me, Meg had an amazing arsenal of her own with plenty of great stuff to choose from.  We primed her skin with Laura Mercier Radiance Foundation Primer, and then I used a Beauty Blender to evenly apply Bobbi Brown’s Skin Foundation Stick in Beige all over.  After a dusting of BareMineral Original Foundation in Light to set it, I used Meg’s two Cle de Peau concealers to the undereye area as well as around the nose and lips.  If I can name one area on the face that always gets overlooked when it comes to concealer, it’s the nose area.  The skin around your nostrils and at the bottom of your nose almost always suffers from discoloration; a good concealer on these spots has a real lifting and brightening effect.  To set the undereye concealer, I used Laura Mercier’s Secret Brightening Powder.

For Meg’s eyes, I stuck with some of my most trusted friends- MAC eyeshadows in Shroom and Cork, and my Dior 5-Couleurs Eyeshadow palette in Earth Reflection.  I used the two brown shades in the Dior palette, along with the pearly-white one for the brow bone and inner corners of the eyes.  The hardest part of makeup for me, to this very day, is properly blending multiple eyeshadows.  I really try to get a look at the eyes from all angles and in both natural and artificial light; I tried to take my time getting this just right because unblended eyeshadow is truly painful to behold (and here’s a tip- shimmery shadows are much more forgiving than matte ones when it comes to blending).  I lined Meg’s eyes with my BFF- Christian Siriano for Victoria’s Secret eyeshadow in Royal- and I don’t know what I’ll do when it finally runs out because I’ve yet to find anything quite like it.  For lashes, we used multiple layers of Meg’s Bobbi Brown Eye Opening Mascara.

img_3019

I did a bit of contouring with Kat Von D’s Shade and Light Palette, and used Chanel’s blush in In Love for cheeks.  I added a bit of highlighting using MAC’s Mineralize SkinFinish on the top of the cheekbones, and a touch of a pearly NARS cream shadow to the cupid’s bow.

Finally, for lips, Meg prepped them with MAC’s Prep + Prime.  We then used Laura Mercier’s lipliner in Natural Lips topped with NARS Velvet Satin Lip Pencil in Bahama- this is the perfect dusty brick-rose with just enough color to be a “statement lip” without needing to be fire-engine red or something.  We had her pack a clear gloss with her along with the pencils, just for extra moisture.  To set everything and give the whole look a diffused effect, I dusted Meg’s face all over with Hourglass Ambient Lighting Powder in Mood Light.

fullsizerender

As for hair, I’d known for a while that I basically wanted to take inspiration from Ahn Co Tran and go for waves with lived-in texture.  This is my favorite look, and frankly, it’s one that I know I can replicate fairly well on others.  Meg has a midlength bob so I knew this texture would be perfect for her cut.

I used my tried-and-true technique of wrapping one-inch sections of hair around a 1.25-inch curling iron, without using the clamp and always leaving the ends out.  If you try this, try to wrap sections loosely so you don’t get a wave or curl that is too tight.  As I progressed through her hair (and I did it in three layers, working from the bottom up), I’d separate any waves that were too big or tight and finish with a generous mist of Bumble and Bumble’s Dryspun Texture Finish- better than Oribe!  I also sprayed Living Proof’s Instant Texture Mist into my hands and worked it into Meg’s hair, too; the Texture Mist provides bouncy hold and sort of acts like a spray-gel, but better.

fullsizerender-3

I kept laughing because Meg kept saying how I understand “the bend”- no one wants their hair truly curled these days, we all just want it to have that awesome “bend” that looks chic and lived in!  It’s the best!

One adorable Majè jumpsuit later and Meg was ready!

fullsizerender-4

I had such an awesome time playing around with this sweet mama- she looked amazing and I was so happy with how much she enjoyed the whole process!  I can tell you that it’s so much more fun with the client is interested and curious about what you’re doing, from the skin prep to the final touches.  And I was truly happy to finally lend someone a beautifying hand on the North Shore- it’s about time!  xo, MR

Daytime Makeup- Simple, But Significant

It’s been two weeks since my last post, and I guess I’ll claim the excuse of having my birthday as a valid reason for not writing.  But seriously!  There’s been plenty going on.  And to complicate things just a bit more, my husband and I now use an HDMI cable connected to my laptop when we want to watch TV.  So, if we’re watching something, I can’t write.  That may sound like a silly problem to you, but I am actually most comfortable with writing if I have a program on in the background.  Yes, I blog and watch TV at the same time.  My modus operandi usually involves one of my I Love Lucy DVDs playing in the background while I pound furiously at my keyboard.  Or my Doug DVDs.  Did I just admit I own Doug DVDs?

Anyways, I’m kind of just giving a variation on a theme here today- another simple, everyday makeup look.  I don’t have a ton of unique inspiration at the moment so I figured I’d just share the easy stuff I’ve done lately.  And frankly, this is my favorite stuff to do on myself or anyone.  Easy peasy.

IMG_2157

Again, we see that even though this look is “no makeup” inspired, there is actually plenty of makeup that goes into it (relatively speaking).  I’ll start from the beginning:  I cleansed my face and then gave my face a couple spritzes of Lush’s Eau Roma toner water.  I then applied a beautiful essence from May Coop.  Other skincare products layered on top of this just seem to make your face glow brighter than a comet.  Because it was already near evening by this point I chose not to use any other serum or moisturizer with sunscreen.  Instead, I applied Clarins Beauty Flash Balm.  This stuff is a little hard to define because it’s not exactly skincare, but it’s not really makeup either.  It’s this fun little enigma of a product that makes getting ready feel a bit more glamorous, though!  I use it as a primer; I applied a thin layer all over my face and then proceed with makeup right away.  It creates a dewy canvas for makeup, and it brightens and blurs the appearance of pores and imperfections.  It also feels cooling, and it smells fresh and floral.

After that, I went for the natural-looking BareMinerals Complexion Rescue in Buttercream and undereye concealer from NARS (and can I just say that I love my shade names- Buttercream for BareMinerals, Custard for NARS).  On my undereye area, I used my new Laura Mercier Secret Brightening Powder for the first time.  I had asked a friend a couple months ago what she used for her undereye area because whenever I see her, there’s always this faint, flattering shimmer around her eyes that seems to mask dark circles and give the area just the right touch.  She directed me to this powder, and it really is lovely.  I also love that it sets your undereye concealer; I’ve needed something for so long to stop my undereye concealer from creasing.  It also seems to prevent mascara from smudging down there, too.  I wore Too Faced Better Than Sex mascara (yes, I know *eyeroll*) and while this stuff is amazing at building your lashes, it smears on to my lower lid pretty often.  That didn’t happen with the Laura Mercier!  It didn’t happen the next day either, when I tried it again.  My eyeliner is courtesy of the classics: Bobbi Brown Long-Wear Gel Liner in Black, and Stila Stay All Day Liquid Eyeliner.  I use a very thin angle brush when applying the Bobbi Brown, and I use it to essentially draw my wing, too.  The Stila blackens it, sharpens it, and fills it in.  Here’s a look with my hair back (with both of the following pics sans filter).

IMG_2156

One thing I’ve noticed is that I’ve gotten so pale out here that most of my makeup is now just a teeny bit too dark.  If you see my face compared to my neck area, you can kind of tell.  Oi.  It is just too dang dark out here, and it’s May!

I chose to use some of the lighter shades in the Kat Von D Shade And Light palette, to help with the color of the Complexion Rescue.  This product is beautiful in that the shades can be very helpful and the textures are super creamy and yummy.  However, you really don’t need a contouring palette, in my opinion.  I’ve had a lot of fun with this one and it’s been worth it to watch a couple YouTube videos to see what others do so I can get the most out of it, but I think you can get away with just bronzer and a shimmery highlighter to get the same basic effect.  One thing I don’t like about using the lighter shades in a contour palette is the fact that they mattify things.  You know I like a glowing finish, and using the lighter shades in the Kat Von D took all the shine of the Clarins and Complexion Rescue away (and to be specific, I used the yellowish banana powder one on the middle-top).  You then need to reapply highlighter on top of that if you still want shimmer, so it can create a redundant process.  I prefer the darker shades meant for contouring.

For blush, I dusted NARS blush in Liberte all over my cheeks.  I used my trusty-and-now-discontinued CK One brow duo for my eyebrows.  I still am not sure what I’m going to use as a replacement for this, but I’ll probably just sell out and go the Anastasia route.  And lastly, for my lips, I just used my longtime favorite- MAC Cremesheen Glass in Strictly Plutonic.  It’s a peachy-pink neutral, and the formula is so much less sticky than the classic Lipglass.  I love it so much, but of course it’s from a limited edition collection so never again!

IMG_2158

This is kind of the makeup I do on a more regular basis.  I’ll switch out the type of foundation, or change the shade of blush, or perhaps play around with eyeshadow (that’s getting serious), but this is a pretty straightforward look for me.  I do give myself props for continuing to improve my cateye, but in the future I’ll continue working on making things pop a bit more.  I mean, I like simple things, so simple makeup really is my jam.  In the words of Don Draper, I like to keep it simple, but significant.  xo, MR

When More Is More: Kardashian-Inspired Makeup

I used to think I really loved makeup.  Well, I mean, I do love makeup.  A lot.  I always thought I loved it more than most people.  However, within the past couple years or so, makeup as we know it has changed forever in some radical ways.  And in light of this, I have to say that my love for makeup as we know it now has become more of a journey than a certainty.  Let me provide a little background.

The rise of the Youtube video blogger in the 2000’s transformed the world of makeup through the power of shared knowledge.  Suddenly, everyday women all over the world were able learn and practice difficult and elaborate techniques thanks to thousands of tutorials posted by other everyday women all over the world.  Some video bloggers have reached mega-celebrity status like Michelle Phan and Jaclyn Hill, with their worth now in the millions.  Instagram offered another avenue for sharing makeup knowledge, along with its glow-giving filters and other fancy apps with capabilities of blurring and retouching our complexions.

Then came the variable with the most impact- Kim K and her Kontouring Kingdom.  Suddenly the world of makeup was launched into the stratospheric heights of what once seemed impossible.  Social media took quick notice, and now you can’t scroll through your feed once without noticing a woman showing off that signature Kardashian-Jenner look: contoured cheekbones, a contoured forehead and chin, golden-yellow highlighting thanks to some type of banana powder, shimmery, pearlescent highlighting across the forehead and cheeks, a contoured and highlighted nose, immaculate eyebrows, full, voluminous lips sporting a matte, liquid lipstick, layered eyeshadow with a flawless cut crease, thick, perfectly-drawn winged eyeliner, and dramatic false lashes.  Throw on a couple filters and there isn’t a flaw in sight.  It doesn’t exactly look natural either, but in this new phase of makeup artistry for every woman, more is more.

I’m not consistently drawn to this maximalist kind of makeup as most know; I find myself more inspired by the work of celebrity makeup artists as opposed to what I see on Instagram (with folks like Mario Dedivanovic and Joyce Bonelli excepted).  However, it is fun to think about all the possibilities in your train case after watching a tutorial on the most elaborate smokey eye you’ve ever seen.  Even if something isn’t quite for you, it can still be inspiring.

IMG_1525

And so, I decided to have a little fun last night and just go for more.  And man, did I not feel like myself.  This was no single wash of eyeshadow topped with a bit of kohl liner and mascara like I usually do for a night out or something.  I followed the formulas of multiple Youtube bloggers that I’ve watched and went through every step in what felt like a game of human paint-by-numbers: mattifying primer, liquid foundation, powder, concealer, contouring, banana powder, illuminating powder, blush, shadow primer, layered eyeshadow (four shades), eyeliner, mascara, false lashes, lipliner, and liquid lipstick.  Everything I used is pictured above, except for the false lashes (which were just accent lashes by Ardell).

And none of the following photos have any filter on them.  I’m simply standing in front of a soft lamp for the ones featuring the finished look.

IMG_1524

BAM.  Crazy!  The difference is almost laughable, isn’t it?  It probably would’ve helped to give a bit more of a smile in the photo on the left, but hey, for dramatic purposes we’ll leave it as it is.  Not hiding the bangs under a beanie helps as well, but when it’s -2 outside and you’ve just arrived at work after battling the oppressive elements, you’re probably going to put your bangs in a beanie too.

But it didn’t turn out too bad, did it?!  I have to say that I liked how I looked in most every picture I took, which isn’t typical for me at all.  That is one thing that this kind of makeup can do well- photos are suddenly not so intimidating.  You just have to find your favorite angles that show off the makeup best.

IMG_1517

Also, understand that to many women (and men too, from what I’ve seen on Insta), this is still total amateur hour. I did not take things anywhere near as far as some Youtubers or bloggers take them, and a lot of people would probably still consider this a soft, natural look. I don’t, but it starts to become a matter of relativity.  Many people have had countless hours of practice with Kardashian level, “extreme” makeup, and they can do much, much more than me in terms of talent and technique.  This is just one of my first takes on it.

I’m convinced that the one detail that really takes things to the next level is the highlighting on the nose.  It’s what kind of gives you that ethereal, almost plastic look.  The Kat Von D Shade and Light contouring palette is also key- I really, really like that palette.  I’ve watched several Youtube videos on how to get the most out of it, and it’s amazing what you can do to the shape of your face with six simple shades.  I tried to do the exaggerated lipliner for that crazy Kylie Jenner effect too, but the fact of the matter is she gets lip injections.  There are complicated contouring and highlighting techniques that can give the illusion of much larger lips, but that tends to require a couple shades of creamy concealer and I only have my match shade.  I just tried things with nude liner and liquid lipstick.

The liquid lipstick I used on my lips was also hard to work with outside of the natural lip line because once it sets on your skin, it dries within seconds and doesn’t budge.  You can’t make any adjustments or changes.  It’s seriously high quality stuff, but you do not wear it for comfort or ease of application.  I used Stila’s Stay All Day Liquid Lipstick in Patina.  You might be able to tell that the lip lines got a little smudgy because I tried to rub the lipstick off in some spots, but it didn’t work.  I basically had to go to bed with this stuff on and it is so unbelievably drying.  Not exactly the comforting, moisturizing formula you’d use in weather with a wind chill factor of -15 degrees.

IMG_1522

No filters here, I promise!  Just in front of a lamp (especially because it was night and there was no natural light to be found).  I’m under a bright light on the left side too, though.

I have to say, the transformative power of Youtube-inspired makeup is undeniable.  It works, especially in terms of making you feel glamorous and photo-ready.  However, it’s not a realistic everyday look for me and my life.  Now that I know I can do it though, maybe I’ll take a stab at it more than once a year.  I just wouldn’t want this to ever feel like the norm because that can take the fun and novelty out of it.  For now I’ll just be sure to keep washing my face and taking good care of my eyebrows.  xo, MR