Best Of The 2017 Golden Globes

I’m not sure there could be a better way to kick off a new season of writing after a couple months’ break than the Golden Globes.  After the social media and newsfeed tumult that was 2016, it’s nice to have a bit of fun with good ole’ awards season and a brand new year to go with it.  It’s like hitting the refresh button and everything coming up glitter.

If I had to describe this year’s Golden Globes red carpet in one word it would be finally!  Finally!  I think this is the first red carpet I’ve encountered in years when I saw consistent risk-taking and some truly incredible head-to-toe styling across the board.  Honestly, most everyone looked great in one way or another.  Even the guys were catching my interest!  Donald Glover in that velvet brown suit with the purplish bowtie?!  In the words of Lando Calrissian, hello what have we here.  Of course there were a couple looks that had me wrinkling my nose, but maybe only a handful.  Overall, the stylists and glamsquads killed it this evening!

Before I list my favorites, try to remember once again that I’m not just considering the dresses- I take into account the hair, the makeup, the jewelry, and the accessories as a whole package along with the dress.  Some “weirder” dresses were made perfect to me by the overall styling pulling it together, while other looks were thrown off for me by maybe just one thing like a necklace.

Alright, enough with that.  Here we go!

Best Newcomer That You’ll Continue To See Forever – Ruth Negga in Louis Vuitton

08globefashion14-superjumbo

Ruth Negga has that gamine kind of look that feels like she’s just stepped out of a chic Parisian nightclub in the 1920s.  Her finger-waved hair and gown that reminds me of the Maschinenmensch in Metropolis are adding quite a bit to that vintage vibe, but this look is giving me Wonder Woman feels too (especially with that cuff she’s wearing).  Considering that Ruth is currently on the cover of Vogue and she’ll probably land an Oscar nomination for Loving, I have a feeling she’s about to experience the kind of meteoric rise to fame like Lupita Nyong’O a couple years ago and we’ll be seeing a lot more of her.  This Louis Vuitton gown is not a bad way to start.

Best Throwback To A Bygone Era – Natalie Portman in Prada

natalie-portman-prada-dress-golden-globe-awards-2017

To say this look is “1960s inspired” would be the understatement of the evening.  This is the 1960s; this whole look could’ve come straight off the set of Mad Men or straight out of Jackie O’s closet.  It’s getting a lot of flack on social media, but I love it.  Natalie’s hair is perfect, and the jewelry and makeup and chrome clutch merely adorn the gown rather than distract from it.  I was pleased to see Natalie wearing Prada as we’re so used to seeing her in Dior.  Prada is a little more playful and colorful, but there’s still something understated and regal about this gown (probably because we know who it pays tribute to).

Best Hard-To-Screw-Up Formula – Brie Larson in Rodarte

rs_634x1024-170108163654-634-2017-golden-globe-awards-brie-larson

A glamorous shade of red.  Shiny, old Hollywood waves.  An incredible, always-flattering sweetheart neckline.  There’s little to be done wrong with a look like this, and I’m learning to appreciate the whole “If it ain’t broke don’t fix it” philosophy when it comes to style.  I knew this gown was Rodarte as soon as I noticed the signature crystals on the bodice, and while it’s not the biggest risk of the evening, who cares?  Brie looks like a Valentine come to life!  This would be a beautiful gown on anyone, but Brie wears it like a dream.

SECOND Best Throwback To A Bygone Era – Drew Barrymore in Monique Lhullier

74th Annual Golden Globe Awards, Arrivals, Los Angeles, USA - 08 Jan 2017

I think the history buff in me was going crazy tonight because I felt like so many gowns referred back to various decades in twentieth century America.  Something I love!  Ruth’s touched on the 1920s, Natalie’s embodied the 1960s, and Drew’s gorgeous dress here is a beautiful throwback to the 1930s.  Moreover, any gown that gets me thinking of art deco and architecture in general is a winner in my book.  Check out those sleeves!  There’s also a closeup shot of Drew’s makeup floating around social media and it is glorious.  I might’ve done something different with Drew’s hair; the dress seems to be calling for something that pulls her hair away from her face.  But you know, it looks so healthy and lovely on its own that I don’t care!

Best Weird Dress Completely Redeemed By Perfect Styling – Kerry Washington in Dolce & Gabbana

kerry-washington-689d9d2a-35f0-406b-af83-738a58d58fd1

Like I’ve said, I like weird dresses that may initially have you going ohhh honey noooooo (or at least scratching your head wondering if you hate it or if it’s magnificent).  However, it’s typically the hair and makeup that rounds out the weirdness of the dress into something I love.  Kerry is good at this- she and her team frequently choose “bad” or “weird” dresses that are then styled into something magical because of a tweak here and there, the right manicure, and an excellent glamsquad.

This is the perfect example.  This Dolce & Gabbana dress is actually floor length on the runway, but the proportions make more sense when the skirt is shortened.  Thanks to strappy sandals and see-through lace, this dress actually elongates Kerry when a floor length dress with capsleeves typically shortens the one wearing it.  The bodice and sleeves are very ornate and complicated, but when you pair it with perfectly smooth, dark hair tossed behind the shoulders, the look seems balanced.  A nude manicure and a complete lack of jewelry aside from a simple pair of earrings allows the elaborately detailed gown to show off without being too much on Kerry.  Top it off with the perfect, purply-brown lip color and she is wearing the dress, not vice versa.  And suddenly, a dress that would normally have me giving the side eye has me ooh-ing and aah-ing.  That’s what stylists do!

Let me know your thoughts!  Any folks you thought looked absolutely stunning?  Any dresses have you dazed and confused?  Do tell, and next stop- the SAG Awards!  xo, MR


Photo credits in order of appearance:  Jordan Strauss for Invision via Associated Press, Getty Images, Rex via Shutterstock, Rob Latour for Rex via Shutterstock, Steve Granitz for WireImage

Frizz And Humidity- If You Can’t Beat ‘Em, Join ‘Em

You know that meme with the super fuzzy rabbit making fun of the electrifying effects of humidity on hair?  You know- Is it humid today?

Well, I hate to be that girl, but it’s a real thing, and you really haven’t experienced humidity until you’ve lived in the MidWest.  Or at least somewhere other than Southern California.  I’ve described California dry heat as ‘blistering’.  And make no mistake- it is.  But I would describe Illinois humid heat as oppressive.  It is a different animal, and it wants to lick you in the face.

You see the grey, cloudy sky outside in August and it fools you.  Boy, does it fool you.  The temperature reads something like 78 but you then look at the “feels like”- more around 90.  You step outside and you feel like a warm, wet dog has jumped on your back.  Or like you’ve just walked into a mouth.  You feel the urge to take a really, really long nap and your sentences suddenly go incoherent.  Someone described walking outside in Midwestern humidity as “like trying to walk between the slices of your peanut butter sandwich”.  Might be true.

But the hair.  Oh, the hair.  And irony of ironies, that I would choose this year to commit to bangs.  Now that I think about it, I don’t think I’ve met a single soul out here that also has bangs.  Except for maybe the five year old boy with the bowl-cut-of-no-choice or the little girl with bangs that make her look like Matilda.  It’s just me and the kindergarteners, because no grown woman would dare make the witless decision to cut bangs in weather that at times feels like trying to backstroke through butter.  Bangs in humidity, when you’ve initially straightened or blown them out, seem to devolve within two minutes into one giant, self-inflicted cowlick that look like some awkward bird’s wing sticking out of your forehead.

But there are ways, believe it or not, of gaining back a sense of power and control over one’s hair in humidity.  It’s not a set of fancy tricks, it doesn’t mean cutting all your hair off (though that is a solution), and it’s actually more of a practice in paradox than anything.

The secret to gaining control over hair in humidity is letting go.

Let. It. Go.

And I’d cue Elsa, but her climate is entirely inappropriate for our topic of discussion, so ignore the frosty connotations.

I woke up this morning knowing that it was a hair wash day for me (about every three days).  However, I knew I’d have no time to dry it, and what on Earth would become of it once I stepped out into God’s Armpit?!?  I had no time, but the wash had to happen.  I actually packed my hair dryer and my straightener with me to bring to work, thinking I’d fix things once I got there or at least blow out my bangs (ha!).  Again, no time.  Got to work, got started with work right away.  The only precaution I took were a few spritzes of Bumble and Bumble’s Surf Infusion on my wet hair before leaving.  I also had neither the time or attention span to think of touching my hair once I got to work either.  I just kept flipping it from side to side, without touching it or my bangs, hoping for the best.

And you know what?  Here’s what I got:

FullSizeRender

Not too bad, eh?  A deep, messy side part along with haphazard bangs also tossed to the side didn’t turn out half as poorly as I’d expected.  Now, some of you are probably rolling your eyes saying, “Oh, my hair would never dry that way”.  Well, keep in mind that this is where humidity actually helps.  Humidity helps bring out wave and curl.  And adding a product with some oils in it like the Surf Infusion will add definition to that wave or curl, and will also help to control some of the frizzies (though obviously not all).  But, if you’re in dry heat, I can’t say your hair will dry this way because there probably won’t be enough moisture in the air to bring out good wave/curl.

FullSizeRender

This oil-infused Surf Infusion is also better for my hair because typical salt sprays tend to really dry mine out, and it’s dry to begin with.  This spray feels extra hydrating without sacrificing the beachy effects.

So again, if you have hair that’s prone to frizz, I think one of the easiest ways to get frustrated with it in humid weather is by fighting that frizz.  It’s honestly better to just roll with it.  And don’t fight volume, either!  Go ahead and flip your hair upside down and shake it out for the most volume you can get (so long as it’s already dry- avoid touching it at all while it’s still wet).  Anytime I’ve tried to keep my hair remotely straight or smooth out here in the summer, it’s turned into a battle where I’m constantly touching it and constantly wanting to reapply something like Alterna Caviar’s CC Cream to keep things at bay.  Ain’t nobody got time for that.

So all this to say, just stop fighting it.  Besides, who doesn’t look okay with big hair?  I mean seriously!  Big, voluminous, crazy hair has always been fun, has always been je ne sais quois, and has always been associated with Beyonce.  Or Diana Ross.  Or someone else awesome that seems to be having a good time in life.  Just go with it.  xo, MR

A Few New Items To Add To Your List

I haven’t written quite as much lately because I’ve been a tad busier and my mind hasn’t had beauty quite on the brain as much either, but that never seems to mean I don’t have time to try something new or browse good ol’ Walgreens. Or Sephora. Or Glossier. I’ve also been super into reading up on beauty these days, so my input has been outpacing my output big time.

I’ve discovered a couple new products that I’m thinking will become new favorites.  The best part of these is that I discovered and chose to try them all of my own, and not because they were in a magazine or on a blog (no irony here) or seen on social media.  That’s the best- when you find something new entirely on your own and then love it.

FullSizeRender

1.  BareMinerals Gen Nude Radiant Lipstick

One of my favorite beauty brands of all time has totally upped their lip game within the past month with four new lip products.  In the world of Kylie Lip Kits, ColourPop cosmetics, and Kat Von D, it’s not to a company’s advantage if they ignore lips these days.  But BareMinerals, being the naturally-focused name that they are, chose to revamp their lip products in total BM fashion- by focusing on making all products “nude”.  That is, by creating a range of products called Gen Nude that covers every shade of “nude” there could possibly be, in four different finishes.

When I came across all this new awesomeness while wandering through Sephora, I was so impressed that a company finally seemed to grasp the fact that “nude” is a very relative term in makeup, and what counts as a shade of nude lipstick for one woman does not at all count as one for another.  So what this amounts to are a line of products that are a whole bunch of delicious “my lips but better” tones, and I had a really hard time choosing just one (and yes, I allowed myself just one).  I ended up choosing the Radiant Lipstick because the texture was like butter and it felt more like a smooth balm than a lipstick.  I use something like this far more than gloss, and I prefer it far more than matte finish.  I’d wanted something with more brown in it than my typically grey-pink that I go for in lips, so I picked Honey Bun after trying on maybe six or seven.  I really, reeeeeeeally like this stuff.

The other products include the Buttercream Lip Gloss, the Matte Liquid Lipcolor (there’s your Kylie competition), and the Under Over Lipliner.

2.  Maybelline Brow Drama Pomade Crayon

What a cinch this stuff is.  I’d wanted something to add more pigment to my brows when my Glossier BoyBrow just wasn’t enough, but I didn’t want to mess with anything too expensive like Anastasia’s Dip Brow that I knew I wouldn’t use so much, or anything that required any other tool besides my hand.

This chubby crayon is the perfect solution.  It goes on really smoothly (it is like a pomade) and very concentrated, so I use a light hand.  I bought it in its darkest shade, Deep Brown, because my brows can handle a decent amount of pigment.  It’s just so easy to use, and then I add some BoyBrow or brow gel and the whole thing is done.

3.  LivingProof Prime Style Extender

As you may know, I can be extremely lazy when it comes to styling my hair.  I’m always looking for that product that will somehow do everything and nothing.  I want my hair left with texture, but not with any crunch.  I want to cut down on frizz (especially out here in the MidWest), but I don’t want things too smooth or flat or without wave.  I tried Bumble and Bumble’s Don’t Blow It but frankly, it did nothing for me (and not in the way that I want, apparently).  If I air-dried my hair without it, it basically made no difference.  But I still can hardly ever get myself to blow dry my hair!  I’m always wanting to air dry, and so the quest for the elusive leave-in styling product continues.  Oils have usually fared well (like Davines Oi or MoroccanOil), but even they can weigh me down a bit and take away from the matte finish I prefer.

Enter LivingProof Prime Style Extender.  It gives my hair just enough tack without stick, holds a style well for 24 hours (and I can’t ask for much more in this weather- hairstyles don’t last more than a day out here), brings out my wave, and doesn’t have any weight to it.  I started using a travel size I received to blow out my bangs, and then started wondering how it would fare on my entire head.  So far, so good!  It’s the best product I’ve used yet when it’s come to air drying (and it’s also supposed to be really great for blow drying, too!).

4.  NARS Audacious Mascara

And this one’s getting thrown in just for fun, because who doesn’t love a fresh, new mascara?  I got a smaller size of this mascara for free with a mini NARS makeover and a purchase, and I’ve liked using it for my “second layer” of mascara like how I use BeneFit’s They’re Real!  After using a slightly tackier, cheaper formula with a very dense brush (usually a CoverGirl Lask Blast formula), I like to use a more wet formula with a very spiky brush like Audacious to separate and “hug” the bottom lashes to really build the base and lash line- I wiggle it around on my lash line a couple times, being careful not to touch my eye.  Such formulas usually help to darken the lashes overall, too.  The formula alone isn’t my absolute favorite, but then again I virtually never use one mascara on its own.  I always use at least two.

Anything new you’re trying lately?  It seems that I’m stumbling upon new launches left and right, but I’m being very selective about what I give a chance to because I feel like I’ve got so much more than I could ever need in the first place.  Let me know if you pick up one of these, or if you’ve been using something new that’s too good not to share!  xo, MR

Tools For Keeping Your Hair In Control When You Aren’t

Coming to both understand and know how to properly work with one’s own hair is a lifelong journey.  We pour through blogs (no irony there), scour through magazines, ask all our friends, experiment with myriads of product, and stare into the mirror for probably what amounts to weeks of time on Earth just trying to get a grip on what it takes to make our hair look consistently great.  There are the rare awesome hair days that we manage to pull off without help of a stylist, but for the most part, our hair is just kind of … there.

Maybe you’re one of those folks that insists on every day being a great hair day, and so you wake up earlier, or go to bed later, bust out the heat tools on a daily basis, take time to actually blow out your hair once it’s washed … but that’s not everyone.  If the aforementioned describes you, I sincerely admire you.  I mean it.  Not in that fake, condescending Well I just don’t have the time for that way (because I probably do have the time, if we’re honest)… I genuinely admire you.  And my side-eye is probably just me being jealous of you.

But for those of us whose biceps start whining at the very thought of blowing out our hair, for those of us who wake up and feel like your hair needs a complete do-over if you’re going to actually style it with intention, for those of us that lack the daily discipline, for those of us who can’t wait for the curling iron to heat up- I give you my list of the most helpful hair tools for when laziness strikes.  And all are meant for unwashed hair.

FullSizeRender

A boar bristle brush

When my hair has become greasy and I have to go out before I get the chance to wash, I find it helpful to embrace the oils and brush my hair thoroughly with this sturdy brush.  It distributes the oils evenly through my hair and smooths things out.  This usually works best when my hair has gone flat at the roots and lost any wave or curl.  It also adds fluff to the body of my hair so that I can pull it back in a full ponytail or a voluminous bun.  You don’t want to brush with something wimpy on second or third-day hair; a plastic bristled brush or something less dense won’t control the oil as well.

A combo of sea salt spray and dry shampoo

In my case, I prefer Bumble and Bumble’s Surf Infusion spray that contains hydrating oils in it along with the salt mixture, because salt sprays can really dry out my hair.  The Surf Infusion brings texture, volume, and some curl or wave back into the lengths of my hair without making it feel like a sticky pile of hay with tacky glue all over it (as is the case with some texture products).  If I add a little Living Proof Perfect Hair Day Dry Shampoo to my crown along with that, I’m usually in fighting shape for another day.

A black elastic headband and some bobby pins

These usually end up being the tools for my hair during the final day before a wash.  I also default to this style when I just want my bangs out of my face.  I pull my hair up in a high bun, try to “neaten” it by pinning down the pieces poking out with bobby pins, and pin any bits falling out as well as my bangs.  Adding the black headband can give it a sporty vibe or something a little more ballerina inspired if the band is maybe a satin ribbon, and if the bun is elegant enough.  Be sure to push the band forward enough and see that it’s not too thing; otherwise, you end up looking more like a high school soccer player.  I’ve been trying to see what I can add to make this look more intentional rather than haphazard; its very easy for a quick bun to look haphazard in my case.  If my bangs are in good shape, they can really take a bun to the next level, as bangs can give a bun that extra “fashion blogger” feel.

On some days, if the lengths of my hair are doing okay, I’ll just pin back my bangs with two bobby pins in an “X”.  A little dry shampoo in the roots and that pretty much settles things.

A shot of cold air with a blowdryer or a spritz of water

Sometimes, the best answers are the simple ones.  Running over your hair with a blowdryer can do different things on different days.  For me, sometimes it volumizes it, brings back texture, adds shine, etc.  Other days, it doesn’t really do anything.  I’m not one for claiming my advice is foolproof; things just don’t always work on everyone’s hair, everyday.  The same goes for water.  On occasion, just spraying my lengths with water has done amazing things.  It’s brought back wave or tamed frizz in certain areas when it’s dry out; other days, my hair dries and looks just as it did before.  My point is, sometimes you just give different solutions a shot and see what happens before resorting to pinning it up.

Any other ideas you have to offer?  I always hear about the braiding solution, but as I’ve mentioned before, that’s something I can rarely do without needing a third or fourth arm.  Anyhow, I’m an open book, so give me your tips!  xo, MR

Current Faves In The Green Beauty World

When I was in my early twenties, I went through a period of time where I was very vigilant about the strict use of green skin care, hair care, and body care products.  I changed my whole routine around age 19 to reflect a more natural approach to self-care as the result of reading up on the pervasiveness of weird, unregulated petrochemicals in the things we slather on our bodies.  I feel like I tried to change nearly everything in my home, all the way down to what kind of toilet bowl cleaner I used (and the buck stopped there; I hate to say that natural is not the way to go when cleaning the porcelain throne).

However, please note that there are still plenty of non-natural products that I’ve tried, loved, and continued to use alongside my natural ones.  I’m never a fan of being pharisaical when it comes to “greenifying” your life.  You’re not a brainwashed sheep if use a drugstore shampoo and really love it, or if you eat a fast food cheeseburger and really love it.  There’s no need to condemn or talk down at others for the way they eat or clean their homes, or assume that you’ve done the “right research”, read the truly accurate websites, and have been given special revelation.  Simply educate yourself, encourage others in love to do the same, and understand that we’re all trying to do our best.

My hair and skin both benefitted greatly from a few years of dedicated green treatment.  The excellent condition my hair and skin were in on my wedding day was, for the most part, owed to a routine that consisted almost entirely of products found at Whole Foods or any other natural grocer found near by.  I still use many, many of these products today, years after initially having discovered them.  Below, I present you with a list of my very favorite green beauty products from almost ten years of trial and error (and the most expensive one is $32).

FullSizeRender

Shampoo- Rahua shampoo

This product is expensive, but it lasts me a very long time and I admit that I’m willing to spend a bit more on my hair (and it ultimately helps preserve my color, which cuts down on salon expenses throughout the year).  This shampoo doesn’t lather the way most shampoos do, mostly because there’s really no detergent in it (and this is a good thing).  For the past five years I’ve used this shampoo for every other wash up until a couple months ago, and I’m excited to start using it again once I run out of my Alterna Caviar Moisture.  Read the ingredients list of Rahua- it’s packed with all kinds of amazing stuff, nothing petro-ish, and I think I’ve repurchased it about four times.  If you’ve liked the way my hair has looked over the years, you can at least attribute a small part of its condition to Rahua.  And bonus- it also looks like a fancy bottle of cognac in your shower.

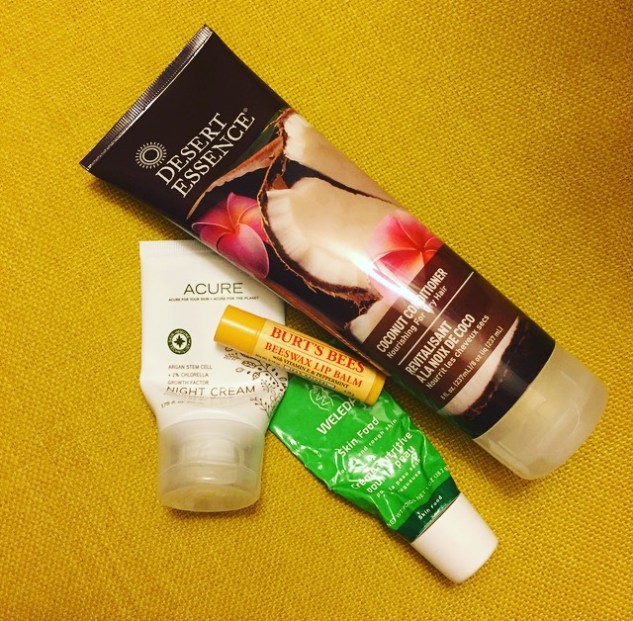
Deodorant- Desert Essence Organics Tea Tree Deodorant

Now, will you still sweat if you use this deodorant?  Probably.  Will you still be a little damp at the end of the day?  Maybe (though I’m usually not; I find that when I wear this deodorant, my armpits are only damp when I wear a sensitive fabric or have been stressed).  Keep in mind that this is just a deodorant; it’s not an antiperspirant and I really don’t think there’s such a thing as a natural antiperspirant on the market.  Our bodies were made to excrete waste through sweat, so the idea of stopping that sweating process all together seems a bit alarming to me.  Attempting to neutralize odor is one thing; attempting to block and stop the natural excretion process of sweat is something entirely different.  So, this deodorant has been my tool to try and achieve a happy medium.

This deodorant does an excellent job of getting rid of odor, and I’ve been using it long enough that my body has adjusted quite well to it.  The one time I always, always use it instead of a conventional deo/antiperspirant is when I’ve just shaved in the shower.  I never put conventional deo/antiperspirant on my armpits when they’re freshly shaved and the pores are open from the steam of a shower.  That’s when your pores are most vulnerable and I don’t like the thought of rubbing an aluminum compound on open pores near my lymph nodes.  So, give it a shot.  I say it’s worth it.  Oh, and a word of advice- use this deodorant, and not Tom’s of Maine, if you’re shopping for a natural solution.  Tom’s contains propylene glycol as its first ingredient; I used it for about two years and then suddenly my armpits rashed over and felt like they were on fire one day.  They had become bright red and were peeling, as if they’d been scorched by the sun. After doing some forum research I found that the same thing happened to numerous folks and the effect is attributed to propylene glycol.  Desert Essence’s deodorant contains none of this.

Night creme- Acure Organics Night Cream

This might be a forever favorite.  I’ve repurchased this four times and I don’t really see much of a reason to look for anything else.  I love this stuff.  I love its ingredient list, I love its texture, I love its price, and I love how my skin looks in the morning after I’ve used it.  Think of it as giving your skin a ton of nourishing vitamins and oils to just work their magic while you sleep.  I find that if I have a bit of pore congestion or dullness in the evening that this stuff just really, really helps to clear and brighten things up overnight.  It also has the immediate payoff of being so moisturizing.  My skin feels cool to the touch after applying it, and the scent is very calming and very “bedtime”.  It does contain lavender and lemon oils, so beware in case you know if your skin is sensitive to one or the other.

I plan on using this for years, and I hope Acure never changes the formula!

Face wash- Burt’s Bees Intense Hydration Cream Cleanser

I used this cleanser to combat the drying effects of another natural cleanser that I’d been using for a long time that had a lot of tea tree oil in it.  The tea tree oil formula had castile soap as its first ingredient, and over time it really stripped and dried out my face (as I’d been using it for half a decade by that point).  I chose this Burt’s Bees cleanser for its great ingredient list and just as something that wouldn’t try to “do too much” to my skin.  Sometimes it’s about meeting your skin’s basic needs rather than trying to “fix” things by going into overhaul mode.  You do not need some nuclear-strength regimen that is about assaulting your face from the outside-in!  I simply do not believe that’s the way our bodies were made to work in the long-run.  I’ve long been convinced that gentle and natural is the way to go when your skin is upset and showing signs of distress, along with a bit of patience and lifestyle assessment (i.e. assessing your sleep, level of activity, sun exposure, stress levels, food habits, and water intake).

This cleanser is so gentle, and the scent is soothing and relaxing (although I do like the scent of their Sensitive cleanser even more).  I’d recommend it for those with drier skin that are looking for something gentle and non-foaming.  Some folks may feel that this doesn’t “clean” the skin deeply enough, but this is actually a preference of mine.  You do not want your skin stripped dry.  I first used it one weekend up in the mountains back in California, where my skin would always get horribly dry and then kind of break out in response.  My skin was soft and moisturized all weekend, with none of the usual problems.  It’s a perfect choice for the dry winter climate out here in the Midwest, too.

Conditioner- Desert Essence Organics Moisturizing Coconut conditioner

I’ve used a lot of the shampoos and conditioners from this line because they’re very reasonably priced and have a decent ingredients list, but this particular product yielded the most noticeable results to me.  I am always looking for hair products that moisturize effectively, as dryness is my main problem when it comes to hair.  I tried the coconut conditioner on a whim, and it left my hair beautifully soft and pliable after rinsing.  I’ve now purchased it twice.  This stuff also manages to fully rinse out, which is more important than you may think.  There are those conditioners that just seem to stay on your hair like a film and weigh it down, but that’s not the case with this one.  Sometimes I’ll use it (or actual coconut oil!) as a pre-wash treatment, and the condition of my hair has been great.  I’m also addicted to the yummy scent.  Tropical scents have a special, transporting quality to me that put a smile on my face (especially out here in the Midwest).

This conditioner combined with the Rahua shampoo is my best natural hair solution.

Lip care- Burt’s Bees Beeswax lip balm

There’s no better lip balm on the market, in my opinion.  A good lip balm is one that doesn’t get you into the habit of needing to use it every hour- you shouldn’t have to; your lips should ultimately be able to bring forth their own moisture.  The menthol in this one is so soothing, works quickly to help lips replenish their own moisture, and brings forth the lips’ natural flush.  And the effects seem to last for hours!  I only find myself reapplying this balm maybe twice a day.  I also love the matte finish it gives; I never like shiny lip balm finishes (and the shine is usually a dead giveaway for petroleum, which you do not want on your lips).  I have a bajillion of these in the bottom of all my bags, but I somehow seem to go through them all.  It’s the best.

Body wash- Weleda Wild Rose Creamy Body Wash

This stuff is a bit of a splurge for the amount you get, but it’s pretty dreamy.  I love a luxurious body wash to look forward to in the shower, and this is one of the more high-end natural brands that I consider more of a treat than a staple.  There’s a pomegranate version that I’ve also tried and loved, but the rose fragrance just feels kind of clean and extra glamorous (and I’m not sure how those two marry, but they do in my mind).  My husband and I used Dr. Bronner’s soap for a long time as body wash, but it left our skin just so dry that we had to try different things (though the Dr. Bronner’s is great for just about any other household use).  When we’re not using Dove, I love to grab a tube of Weleda for some fancy Gwyneth Paltrow Goop-y vibes.

Face moisturizer- Weleda Skin Food

I have yet to find my holy grail daytime moisturizer- contains SPF, doesn’t rub off and pill to the touch, a natural formula, and a glow-giving finish, all in one.  I confess that I’m still looking for that perfect mix.  There are many moisturizers that can carry three of the four aforementioned qualities quite well, but I’ve never found one that hits all four.  Most natural formulas with SPF I’ve tried have the problem of rubbing off and pilling.  So, putting any makeup on top is out of the question, and most formulas like this also have the trouble of just sitting on top of your skin and never fully absorbing.

Weleda’s Skin Food does the following: it gives a beautiful glow, has a solid natural formula (packed with some seriously lovely fruit and botanical extracts), and doesn’t rub off (though I’d still give it a minute or two to absorb).  It is categorized under “hand and foot creams” on Weleda’s site, but I’ve read about many a makeup artist using it on the face (including me!).  If something is relatively natural and works great for the skin on the hands, chances are it’ll cause no different effect if applied to the skin on the face.  I love mixing this with liquid foundation, and the scent is kind of mellow and citrusy.  However, Skin Food contains no SPF and some may find it too heavy for everyday use.  It is very rich and can be used anywhere on the body, but those with oily skin will probably not enjoy it as a facial moisturizer.  I’ll keep you posted on if I find anything that fits all my ideal requirements, but for now, this is the one with the best ingredients list that I know of.

And there you have it!  But I’d like to offer an important sidenote- after perusing through these favorites of mine, you may have noticed that none of these products are labeled as “organic”.  That’s because none of them are.  In order for anything to truly qualify as USDA certified organic, every single ingredient within the finished product must also be USDA certified organic, and the finished product itself will be visibly labeled as “USDA Certified Organic”.  Within the realm of beauty, such a thing is still pretty difficult to find.  Now, one singular ingredient within a finished product may be organic, or the word “organic” may be used in the brand or product name, but that does not mean that the product you are using is organic.  And the use of the word “natural” in labeling and branding in beauty carries about as much weight as your body, on the moon.

So, with that having been said, you really have to just kind of learn to navigate an ingredients list.  It’s difficult to find any kind of beauty product that is entirely USDA certified organic, but it is easy to learn the difference between a list of petrochemical and synthetic ingredients as opposed to a list of easily-pronounced, familiar botanical extracts.  But again, just educate yourself, pay attention to the lists of ingredients you encounter, and keep doing your best.  I’m right there with you.  xo, MR

#EmptiesChallenge Update 3

Yes, I am still trying to keep this up!

However, you could probably drop the “empties” term from the whole thing and just call it an “empties update” from now on. Because there really was no particular end goal in mind for this, my so-called Empties Challenge has developed into more of a general tracking and analyzing of spending habits.  So, this may be a little boring for you as a reader, but I’m basically going to lay out what my beauty spending has looked like for roughly the past three months and discuss what can be improved and what expenses lie ahead.  I’ll also match it against what I’ve used up and finished at home.

My last update was on January 29th, so I’m just going to focus on purchases and empties for February through April.

I’ve only had five complete empties for this entire time period, and they don’t amount to much: a mini Kerastase Masquintense, Davines Momo conditioner, Burt’s Bees Sensitive facial towelettes, another CoverGirl Clump Crusher mascara, and finally the Sally Hershberger keratin spray.  I am still almost out of a lot of things, like my Acure night cream, Clarins Beauty Flash Balm, UNITE 7 Seconds conditioner spray, my first Glossier Boy Brow, and my Shiseido Ultimune serum that I use at night.  My NARS concealer is still holding on for dear life, too.

It’s frustrating how slowly I manage to go through things (except the Shiseido- I manage to go through serums like water).  Part of what’s happened though is I’ve been trying to use other, lesser-used items in my possession, so that’s put some of the almost-finished ones on hold (especially in the hair department).  I’ve also been going through lots of samples like Kerastase’s Elixir Ultime conditioning mask, but I couldn’t abide the scent of it so I discarded it after one use.  Nevertheless, going through samples has slowed things down too.

This right is here is what a full, daytime skincare routine consists of for me if I’m firing on all cylinders.  Three of these items were gifted to me, two were purchases of the past few months, and one has been with me for a while and is nearly finished.  It’s just a mix of stuff I have going on, so getting through some of the bigger products without being wasteful is a challenge.

IMG_2051

Now, let’s look at what I’ve purchased.  And I’ve kind of blown it.  Or at least, it feels that way.

February was the worst.  I bought a BeautyBlender, cleanser for the BeautyBlender, a Becca Mineral blush, and a new Lancome Teint Idole Ultra Longwear Foundation Stick.  That may not sound like much, but it adds up.  I also bought my husband a fancy new beard oil to replace the nice IPA one that my mom got him for Christmas (Go Mom, and yes, IPA beard oils exist!).

March was a little better.  I got a bang trim and a blowout (booked an assistant stylist for a much cheaper price!), but I walked out of the salon with a new Denman brush.  Now, that brush has been exactly what I’ve needed for my bangs, but it was still something like eighteen bucks.  I also purchased the Phase 2 Glossier kit on the day it debuted.  Curse you, Glossier!!!

This month in April I’ve purchased an Ole Henriksen Truth Serum Vitamin C Collagen Booster, and that’s it.  Whew.  My mom and I went out for birthday mani-pedis while she and my dad came out to visit, but I don’t really count that toward this challenge.  Beyond this, I’m declaring a full moratorium on all unnecessary expenses for three weeks (beginning with this past Monday).  The moratorium will end on Monday, May 9th, just in time for  … my dental appointment.

I’m kidding; a dental appointment isn’t exactly a frivolity.  What I’m really saving for is my birthday in the middle of May; specifically, the hair appointment I’ve been thinking of gifting myself with once I’ve saved a little.  And because it’s now about that time, I’ll be needing to book for color, and that has got me a wee bit terrified.  Justin Kamm is the only stylist that has ever colored my hair and since he’s back in CA, I’ve been researching all kinds of options in Chicagoland for weeks.  We’ll see what actually happens within the next couple months, but it’s worth it to nail down a salon out here that I can trust either way.

There aren’t a ton of Davines salons out in this area, so I’ve been looking into a couple Aveda ones since I really love and trust the brand.  Then there’s the question of Do I go big and book a high-end salon in the city?  Or is it more a thing of Trust the junior stylist that did a great job with your bangs/blowout and just say a few prayers?  The junior stylist’s prices will obviously be much more reasonable, but there’s also the fact that if it doesn’t turn out the way I’d hoped, the loss wouldn’t feel so detrimental.  It’s one thing to have a junior stylist in the next town over make some boo-boos with your hair that you can easily have corrected, and that you paid a discount price for; it’s another thing to book an expensive salon an hour away, have crazy high expectations, pay a ton of money, and then, if the worst happens, have to awkwardly try and tell these highly-reputed folks that you don’t like what they’ve done.  And then if I had to make a second trip back into the city for corrections?  Quelle horreur!  But like I said before, we’ll see what happens.

All that to say, I’m still attempting to plug away at my current stash of goods and put off appointments when I can afford to.  Even though it’s hard and purchases have cropped up here and there, it’s going to feel good to get through these next three weeks without buying anything.  Along with the hair appointment, I’m hoping to save for Alterna’s Caviar CC Cream, Laura Mercier’s Secret Brightening Powder, and perhaps a lighter fragrance for summer.  You feel the sunshine coming out from hiding in such a powerful way out here; you can’t help but want to celebrate with all five of your senses!  xo, MR


How To: Seriously Beachin’ Waves

Loose, shine-free, textured waves are my favorite kind of hairstyle.  It’s fairly easy to replicate the look on myself because my hair has some natural wave to it, so the bias is obvious.  However, I do love the different which-ways you can make waves go, and I like their easy, laid-back feel.  My friends will tell you that one of the ways I express friendship is by “waving” your hair- I’m not kidding.  It’s the most relaxing process for me.  And just the word “wave” evokes peaceful memories of the ocean, and being a California girl, that’s never a bad thing.  Although, authentic “beach waves” with a bit too much salt going on can get a little crusty if we’re honest.  There’s a difference between looking like you spent a weekend at Laguna Beach or a year on an island with Tom Hanks in a loincloth.

When I create my own waves, I go by a couple tried-and-true tips so they don’t look too neat, but I do want to make sure they have plenty of body.  If you have curly hair, the general method is to blow your hair out straight first and then create the waves, but that’s a lot of heat and effort so I understand if you bypass this how-to with an annoyed eyeroll.  I’d encourage you to still give it a shot though, when you’ve got extra time just for fun!  If you have stick-straight hair, this may still work but you will probably want to crank the heat on your curling rod and a good dose of hairspray won’t hurt, either.  Regardless, see if this works for you too.  I love straightening my hair when I have time, though it’s a different kind of vibe with bangs.  Making my hair extra curly is the hardest for me, but it’s been really fun the few times I’ve executed it well.  Waves are just the easiest for my hair type, and here’s what I do to get them.

IMG_1755

Step 1:  Freshly washed hair works best, because you can rough dry it and give it serious volume.  I’ll wash and condition my hair, comb it through with a wide-tooth comb and a few sprays of Unite’s 7-Second Conditioner, and give it some time to air dry.  This allows at least a little natural texture to come through, which is good.  If I’m doing my makeup, I try to take this time to apply moisturizer and get my face makeup on while my bangs are still pulled back.  Once my bangs are dry and styled, it’s hard to do my makeup without messing up my bangs.

Step 2:  After my hair has had a little time to dry (think like, 60% dry), I’ll use a blowdryer to rough dry it the rest of the way.  No brush required (except for the bangs, just a little bit)!  I’ll flip my head upside down and all that, and just kind of go at it until it’s dry.  You don’t want to lay a heat tool to it while it’s still damp at all, or you’ll basically boil your hair.  After it’s dry, I spray some more heat protectant on it and let that settle for a minute.

Step 3:  I wave my hair in three sections- bottom, middle, and top.  I’ll use a clip to keep the upper sections of my hair out of the way as I go.  Using the Hot Tools 1.25′ curling iron, I’ll take small chunks of hair (probably 1-inch sections) and wrap them around the iron.  The key is to not use the clamp; just wrap the hair around the iron and hold it there for a couple seconds.  When you wrap the hair, don’t wind it tightly around the iron; think more of a languid, ribbon-around-the-Maypole kind of wrap as opposed to tightly winding thread around a little spool.  You want these waves to be loose and lazy.  Also, I try to not wrap hair in the same direction every time.  I try alternate between wrapping forwards and backwards, although if you wrap in all one direction I actually don’t think it turns out that bad.  Another thing- I leave the ends out!  That’s a big part of the beachy feel; don’t wrap about the last inch of hair around the iron.

Now, I suppose you could just use a curling rod for this whole process, but the results with a rod are almost a bit too precious from my experience.  The best rod I know of is the Sarah Potempa BeachWaver, but Hot Tools costs a fraction of the price and they yield the same results in my opinion.

Step 4:  Time to apply texture product!  As you curl each section from bottom to top (and by curl, I really mean wave), liberally mist a dry texture spray all over the waves you’ve created.  I like Bumble and Bumble’s Thickening Dryspun Finish and Oribe’s Dry Texturizing Spray.  Spray it into the roots and, as you go through each section, flip your head upside down and shake out your waves with your hands.  Additionally, take another texturizing product that isn’t dry, like Living Proof’s Instant Texture Mist, and apply it to the ends.  I spray some of this into my hands (because it can be sticky) and scrunch it into the midlengths and ends.  I love the effect of this particular product; it gives a piecey-ness to the look.  You can also try a wet sea spray like Bumble and Bumble’s Surf Infusion like I did this time; it has moisturizing oils in it so it not only gives that beach effect to my ends but it also moisturizes them, which is nice after all the heat styling.  And it has just enough sea salt in it to not be too drying.

FullSizeRender

A lot of people also like to add a mousse or some other volumizing product before they begin rough drying, but my personal experience has been that applying stylers after drying my hair is the most effective.  I get plenty of volume with a dry texture spray, but if you have success with a product applied to wet hair, by all means go for it.

The nice thing about this style is that it tends to hold up pretty well the next day.  You can always go back over sections with the curling iron again, too.  And dry texture spray also functions as a dry shampoo; that stuff is seriously the gift that keeps on giving and is by far my favorite hair innovation of the past five years.

Let me know if you try this or these products, and tag me in your pictures if you do!  xo, MR

Best Of The 2016 Academy Awards

Alright, kids.  It’s that time!  I think the first thing I should note is that there were so many people missing tonight!  No Lupita Nyong’O, no Jennifer Lopez, no Emma Stone, no Gwyneth Paltrow, no Halle Berry, no Jennifer Aniston, no Amy Adams, no Viola Davis, no Angelina Jolie, no Kate Hudson, no Beyoncé, no Nicole Kidman – and those are just the regulars that I feel we see on most every Oscars red carpet.  So, that kind of bummed me out as I always look forward to seeing what I would classify as the heavy-hitters.  However, there are always the after parties so we’ll see what those bring.

Bear in mind that I take into consideration the entire look when determining my favorites.  This means I like the hair, the jewelry, the makeup, everything (and not just the dress).  So, here are the four from tonight’s Oscars red carpet that I absolutely adored!

Best Fantasy Moment

Cate-Blanchett-730

So, I’ve seen stuff on the internet about this dress saying things like, “Step away from the glue gun, Cate”, and that it looks too crafty.  Um, I’m sorry, but have you ever made a craft that looks as good as this dress?!  I mean, COME ON.  Cate looks like the epitome of a fairy princess in the best possible way wearing this gorgeous Armani Privé gown.  With her dainty, elven face, gowns like this are a perfect match for her.  Feminine, flowery, and in a shade that I’d describe as robin’s-egg-blue (with crystal details and what looks like little purply bits found in the flower appliqués), this was the first look I saw tonight that made me squeal.  It’s that every-little-girl’s-fantasy kind of dress.  The silhouette is incredibly flattering, too, with the exaggerated shoulders and deep v-neck.  Simple beautiful.

Best Moment of SHUT THE FRONT DOOR YOU IS LOOKIN’ HOT!

kate-winslet-76cbd38f-26b7-4fdd-9064-e48fcda3a4b5

Yeah, Kate Winslet is aging backwards.  I mean, the woman just doesn’t age (though a contract with Lancome does help- Genifique, anyone?).  Her face has evolved into one that evokes Old Hollywood glamour and sophistication, and her red carpet styling always lends itself quite well to that aesthetic.  This particular look, however, took a bit of a sidestep away from the stately sophistication and veered more into HOT MAMA territory.  I mean, wow.  The loose waves coupled with the shiny texture of this Ralph Lauren gown amounts to a look that is at once futuristic/edgy and timeless/simple.  I am crazy about the liquid feel of this silk lame.  And her standing next to Leo?  Twitter just about lost its mind.

Best Moment of Redemption

jennifer-lawerence-2fcf2cc6-0916-4c3e-a3bb-e80b7b78ecaf

Confession- I have felt for a long, long time that the partnership between Jennifer Lawrence and Dior has been a huge mistake.  I just don’t really find that Dior suits Jennifer.  She’s a young, cool girl with an edge of crass to her, and Dior is the pinnacle of ladylike sophistication seen on the likes of statuesque, elegant actresses such as Marion Cotillard and Charlize Theron.  It just doesn’t jive for me, and the gowns and clothes that Dior has had Jennifer wear always seem to end up wearing her instead.

However, tonight was a welcomed exception.  This dress felt cool.  This dress felt edgy.  This dress felt young.  And the overall styling was fantastic.  I love that Jennifer’s been going more platinum with her hair these days.  That icy white platinum look?  Ooh, I love it.  I’d do it myself if I knew my hair wouldn’t literally snap off in heaps after three weeks.  I’d need a bucket of Olaplex to survive.  But anyhow, hats off to the JLaw team tonight.  She looked stunning, and I’m thinking she and Dior may have turned a new corner in their relationship.

Best Moment of Color

29oscars-red-carpet14

A silhouette like this typically isn’t my favorite because we’ve seen it so much, but for some reason, this outstanding shade of vermillion makes it all okay.  I think it also may be the fact that we never see Charlize in this color.  We’ve seen her look stunning in gold, white, black, and baby pink, but I don’t think we’ve seen her choose serious color for the Academy Awards since 2010 when she wore her lilac bustier gown (which everyone hated but me).

My most favorite look of Charlize’s is actually the forest green Dior gown she wore to the 2006 Oscars, back when John Galliano was still at the helm.  It was so dramatic with that giant bow, and the color was so unexpected.  I guess that’s what I love Charlize for- she can wear absolutely anything, so unusual silhouettes and bright colors are always a delight on her.  And I have to say, if Imperator Furiosa had to walk a red carpet and couldn’t choose to wear black, it may as well be this uncompromising shade of red.  My mom loved it, too!

Other honorable mentions include Naomi Watts’ gown that reminded of the Rainbow Fish, Margot Robbie’s I-am-literally-a-golden-Oscar-statue moment, and Saoirse Ronan’s gorgeous shade of green that made me think of a mermaid.  I also liked the architecture of Olivia Munn’s gown.  Alicia Vikander’s dress was beautiful too, but the whole look was definitely a bit too inspired by Belle, all the way down to the half-bun.  Daisy Ridley’s was pretty but I would’ve preferred a full-length gown, and Julianne’s was nothing special to me.

Rachel McAdams’ was a bit of a yawn for me too, and while Brie Larson’s gown was really pretty her hair styling sort of ruined the look for me.  I’m not much for pulling back hair that way with a flowy gown that has lots of movement.  I would’ve loved to see some loose waves, or contrast the gown with a sleek chignon.  And Rooney Mara has become as predictable as ever!  I don’t expect to ever see her in bright pink or anything like that, but there’s got to be some way of changing things up while sticking to her general elegant-goth aesthetic.

Well that just about wraps it up for me, and now its time to dig for some extra details on the makeup- my very favorite part!  Give me your thoughts and let me know what you think.  And now, it’s time to start the countdown to the Met Ball!  xo, MR

Photo credits in order of appearance to: Jordan Strauss/Invision/AP, Jason Merritt/Getty, George Pimentel/WireImage, and Unknown on Theron image.

The Care And Keeping Of Bangs

I got a bang trim today.  It was my first trim since getting them on January 2nd, so it looks like I can go about five weeks before they’re on top of my eyelids.  I could probably let them grow longer and just part them in the center a la’ Alexa Chung, but that’s not really the look I’m going for.

It hasn’t been half bad taking care of bangs this time around, honestly.  If you’re considering them, just remember that you will need to style them every day.  And if you typically let your hair air-dry, well, you’ll still want to give your bangs just five minutes of time with heat and a brush because they may not look as naturally flattering as the rest of your air-dried mermaid hair.  You may just look like you’ve got mermaid hair with a Medusa forehead.

Here are a couple extra tips for keeping your bangs in Charlotte Gainsbourg condition, should you be interested:

  1. No round brushes! EVER! Unless you’re going for the perfect pipeline-shaped bangs you had when you were five, I urge you to stay away from round brushes hen drying your bangs.  I’ve found round brushes just make my bangs too, well, round.  The best instructions I’ve found on blowing out your bangs can be found here on my Pinterest.  Using a blow dryer, I’ll give them a little air from the left, then from the right, a little from straight above, and then I’ll very carefully use a flat brush (my Bass paddle brush is all I have right now, though I’d like something smaller) to pull them taut in sections.
  1. Use a drop of styling cream to keep your bangs in place. While they’re still wet, I’ll distribute just a pea-sized amount of R&Co Jackpot in my bangs before I hit them with heat. Blow-drying bangs without any product can leave them almost too soft and pliable; a bit of styling cream gives them just the right amount of hold and grit that’ll last you a day or two.
  1. Bangs look their best when the rest of your hair has volume. Unless you’re going for an intentionally sleek look, get out all the mousse and texturizing sprays you have and go to town on the rest of your hair.  Bangs paired with flat hair can look a bit childish, while bangs with some nice teasing at the crown look more balanced with a Bardot feel.  I’m not trying to tell anyone how to look; these are just my personal observations.
  1. Dry shampoo, as you can imagine, is your best friend by day two. It’s very difficult not to keep touching your bangs because it is literally hair in your face, but a spray of dry shampoo can easily remedy a case of the 4:00pm greasies.  But don’t overdo it- I seriously get by with one spray of Living Proof’s dry shampoo in my bangs.  It’s harder to brush dry shampoo out of bangs and make it disappear because there isn’t as much hair to absorb it.
  1. When you’ve had your bangs cut in a way you like, ask your stylist for the exact steps on what he or she does (and take a picture of yourself with your ideal length!). Chances are you may end up in a different salon for a quick bang trim on the fly (or at least, that’s what I’ve done).  You should be able to repeat the steps to another stylist.  Otherwise, if you give no instructions, your blunt bangs could end up wispy, your long, fashion-length bangs could end up too short, and so forth.  Pictured here, my ideal length.  And an accompanying shot of what happens when they do what most hair does- grow.

IMG_1668

  1. Careful with the flat iron. I think it’s tempting for many to air dry their bangs and then give them the treatment of death by flat ironing them into submission.  I strongly advise against this.  While you don’t want tunnel bangs, you don’t want them slap against your forehead either or with weird stick-straight ends jutting out.  I only use a flat iron for touch-ups, like after I’ve woken up and they’re bent all weird.  I try to keep the tools squared around the brush, the comb, and the aforementioned potions.

FullSizeRender

I think that’s all I’ve got from this past month of experience.  I’m excited that I have a little excuse to drop into a salon every month or so now; bang trims are typically complimentary.  And I wasn’t too ashamed to dash out quickly after this trim, considering I was left with a cowlick as high as the heavens.  No seriously, it was a half-inch higher than the rest of my hair.  I literally put my hood on as I walked out of the salon.  No one needed to see that on a Friday.  xo, MR